
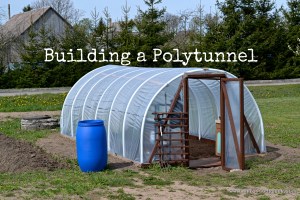
Building a Polytunnel
In our village almost every house has a small greenhouse. Sometimes they are sturdy constructions made with metal frames and glass or hard plastic windows, but mostly they are hand-built with frames made from either off-cuts of wood or PE piping, covered with a sheet of thick, clear plastic.
Last summer I grew a variety of vegetables in the garden and I was mostly happy with the results. I had a constant supply of lettuce and a bumper crop of courgettes (zucchini), among other things. But this year I want more. I plan on planting larger quantities of basic crops like onions and garlic and a wider variety of vegetables to include ones I can’t easily find here in Lithuania, like green cabbage.
This year I was also determined to join my neighbours in planting a greenhouse. We love tomatoes, peppers, chillies and, of course, cucumbers for pickling. As part of our journey into self-sufficiency I wanted to grow an ample supply of these to eat fresh during the summer and to dry, can and bottle to see us through the winter.
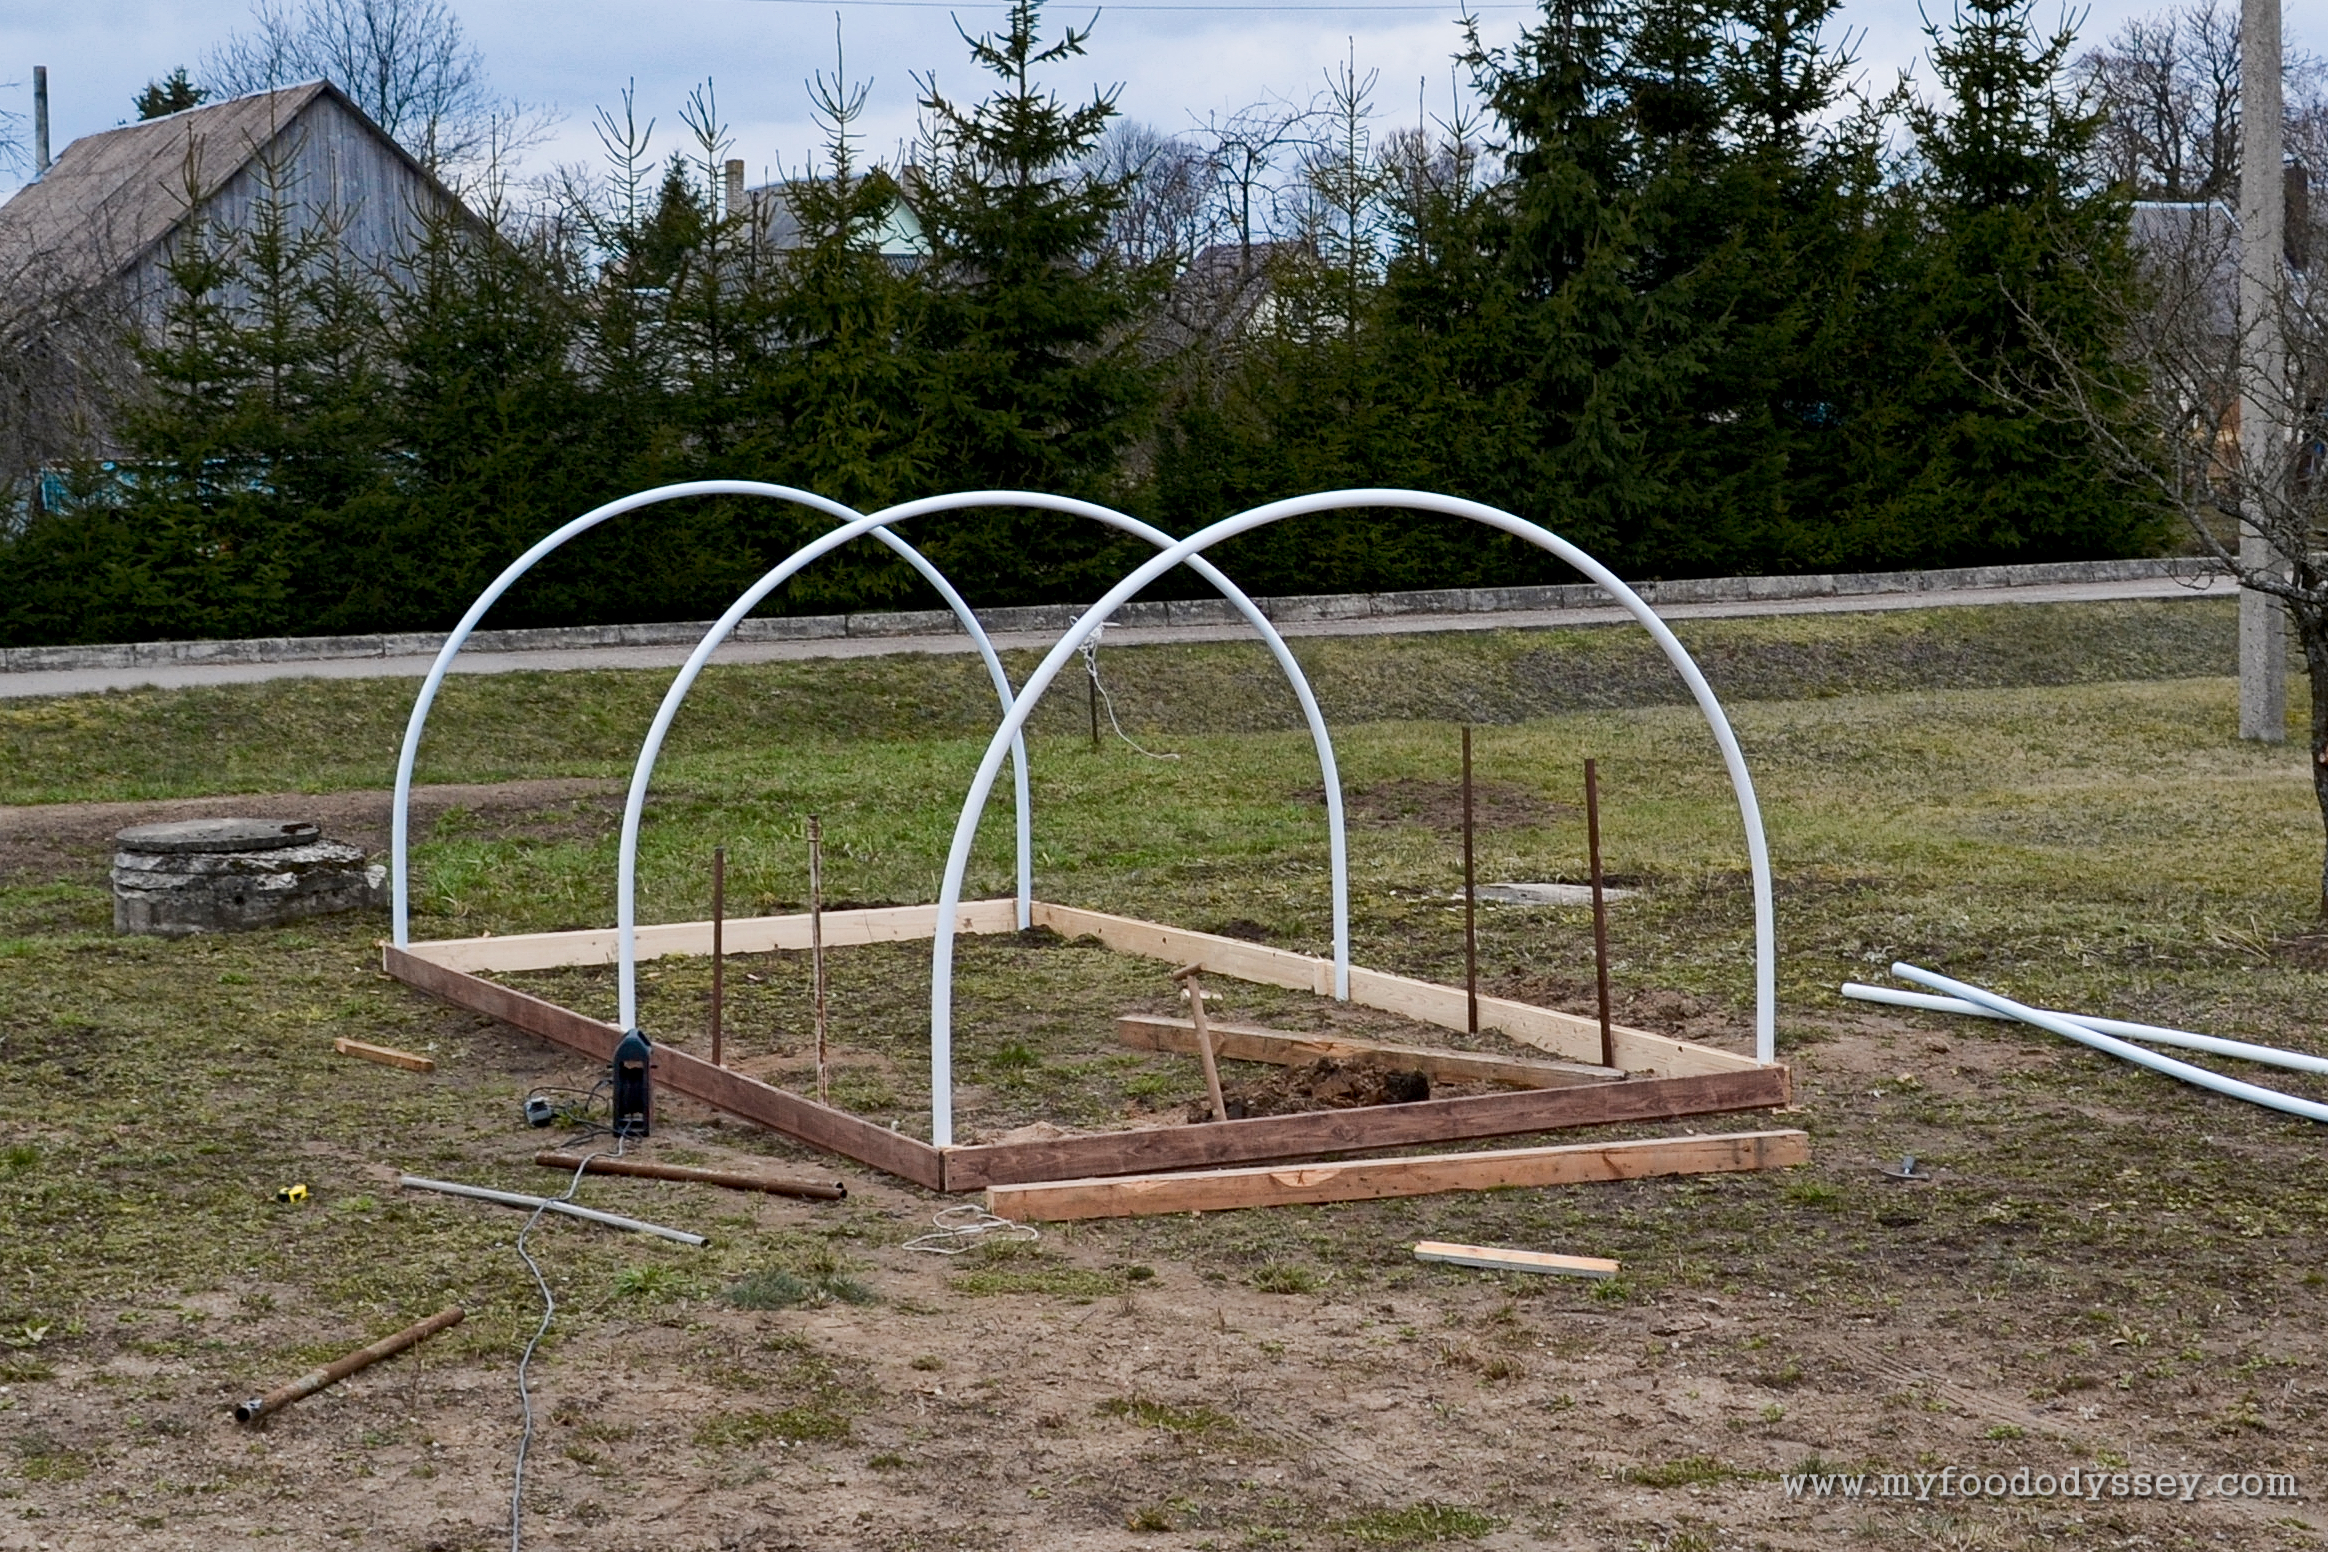
Our garden is quite big so we decided to build fairly a large polytunnel. We weren’t sure we’d use all the space in the first year but we felt it would be a shame to build it too small and then end up having to extend it in future years. The PE piping for the frame comes in a standard length for a 3-metre wide polytunnel, so it was really just the length of the tunnel that we needed to consider. After a little research and confab with neighbours we decided on a 3m x 6m (10’ x 20’) tunnel.
I picked a spot close to the back door (for easy grab-and-cook) that was not shadowed by the house and therefore got sun all day. I staked out the measurements and Arūnas set to work building the frame.
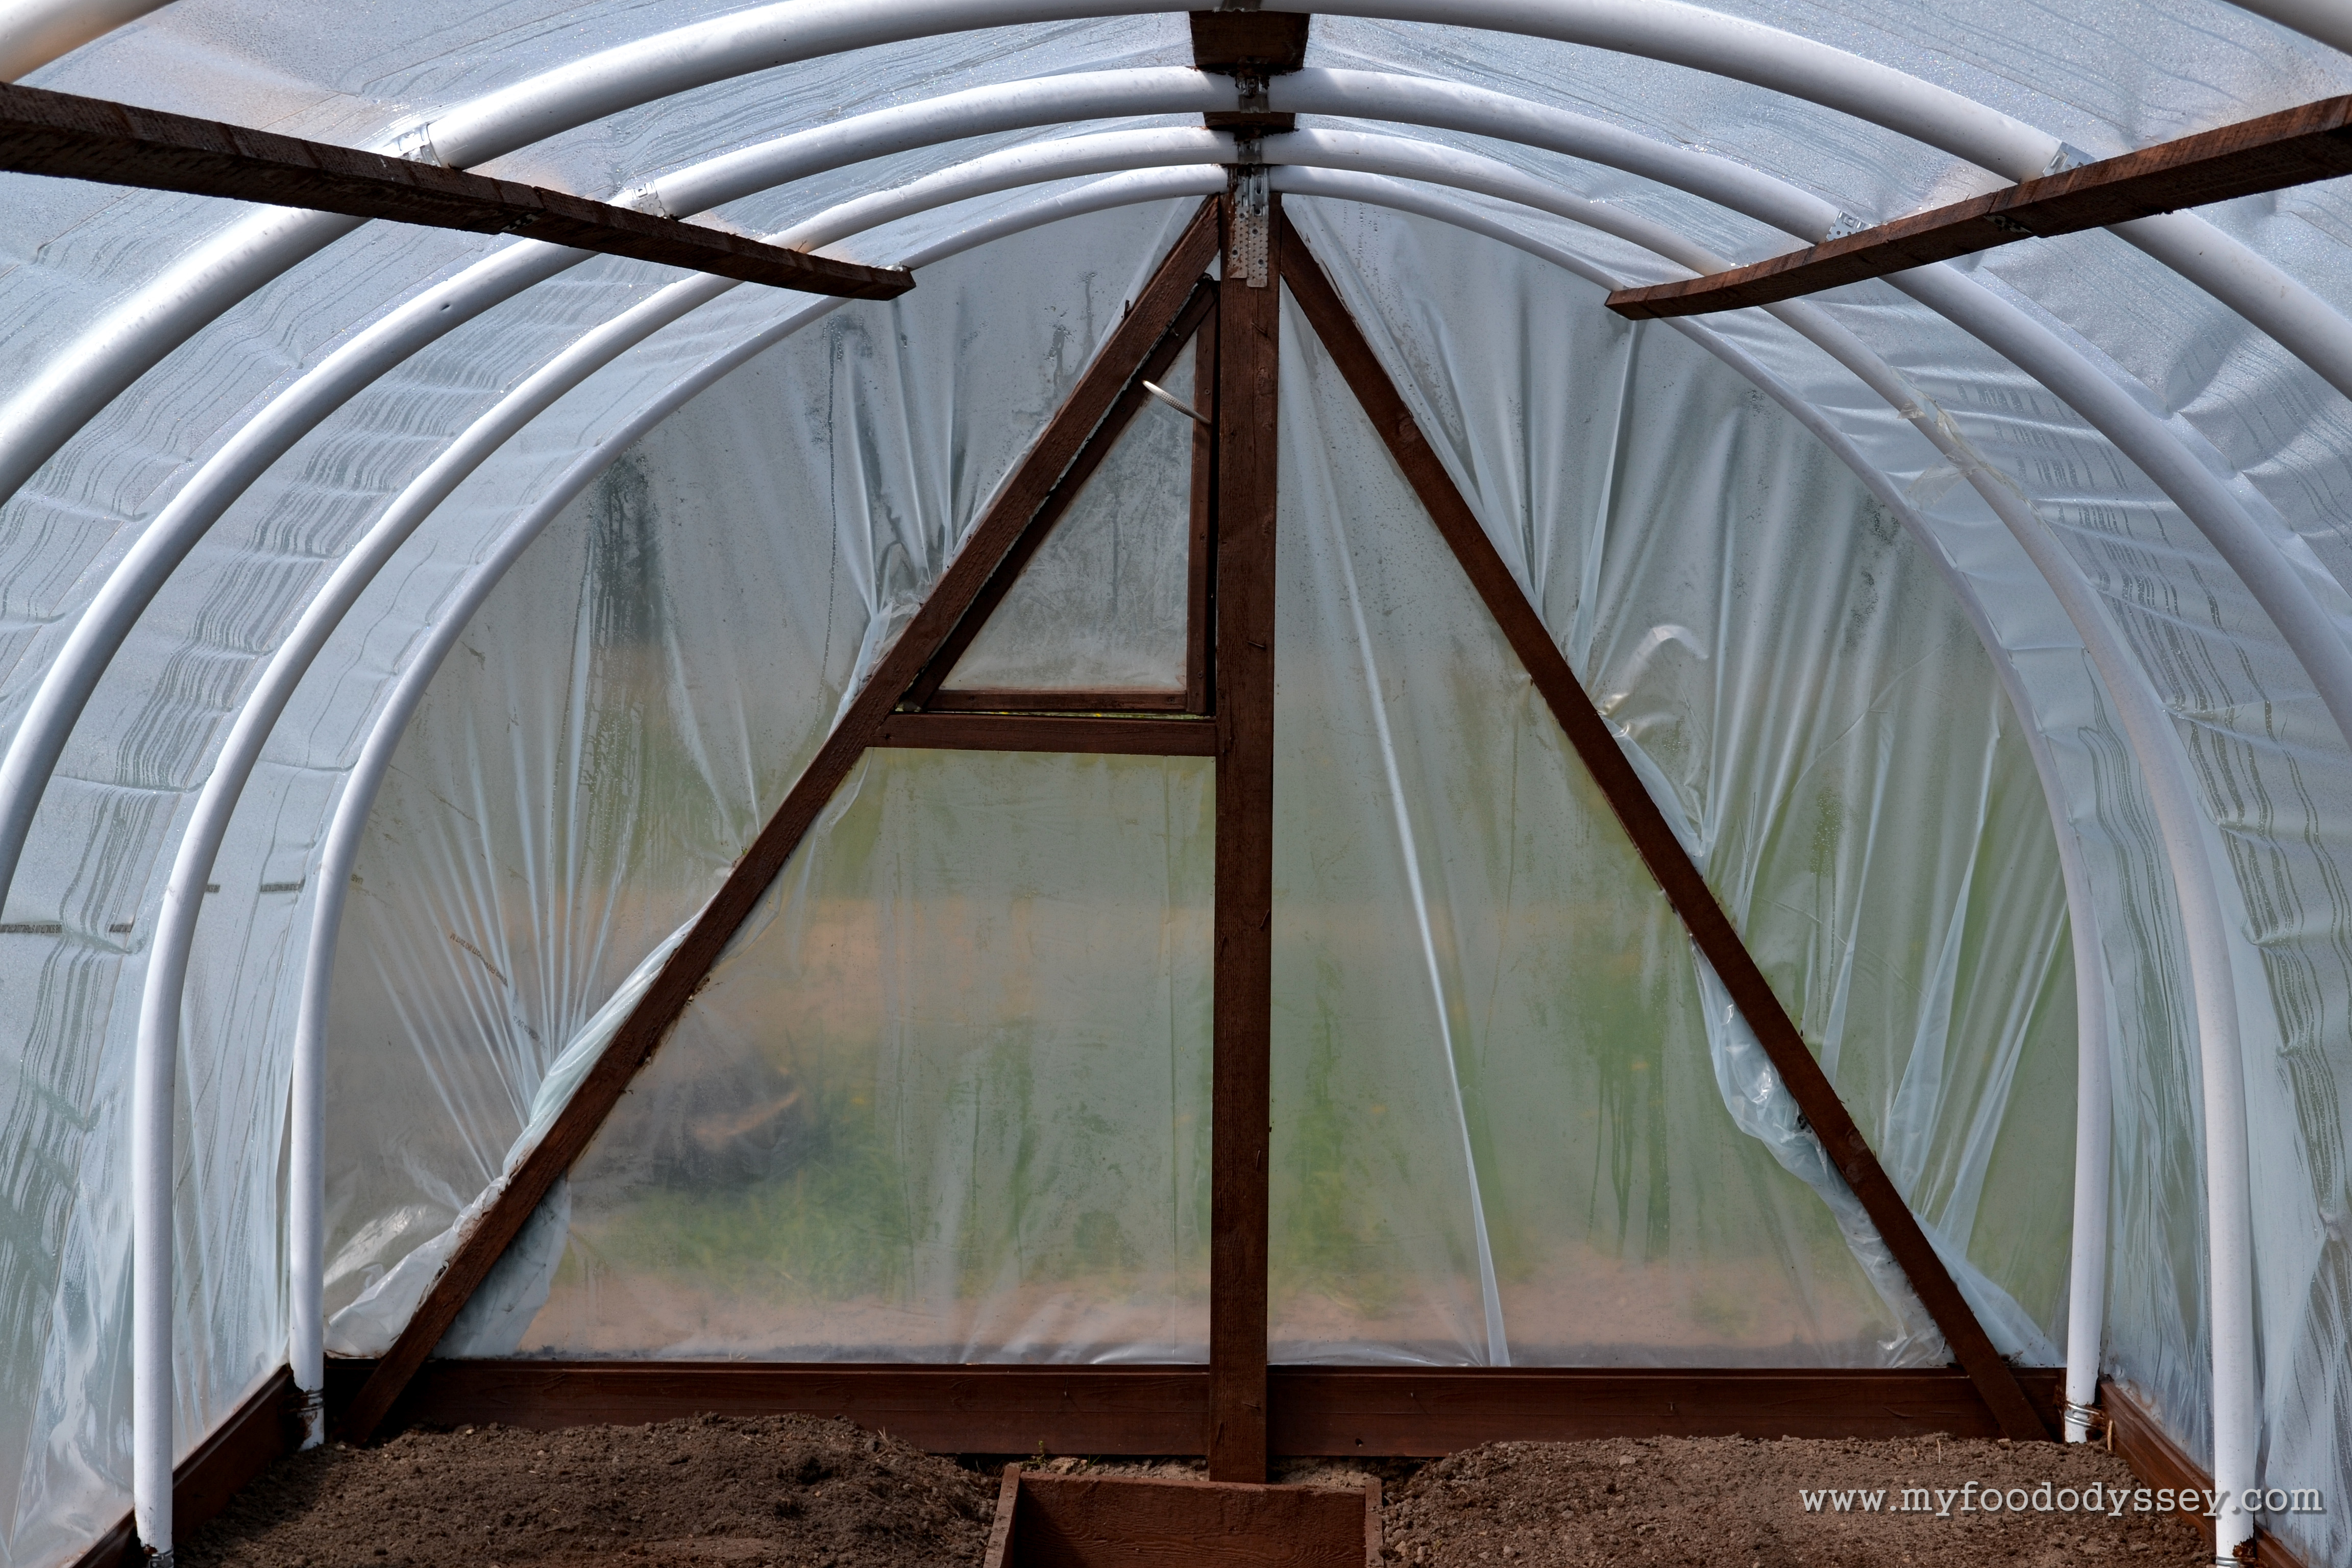
For a 6 metre length we decided on 7 hoops – one every metre. Arūnas started by building a wooden frame around the perimeter. He then drove 1 metre (3’) metal pipes 30 cm (1’) into the ground to act as supports for the PE piping. The PE pipes where then set over the metal pipes across the width of the tunnel. The PE pipes were secured to the inside of the wooden frame with metal connectors.
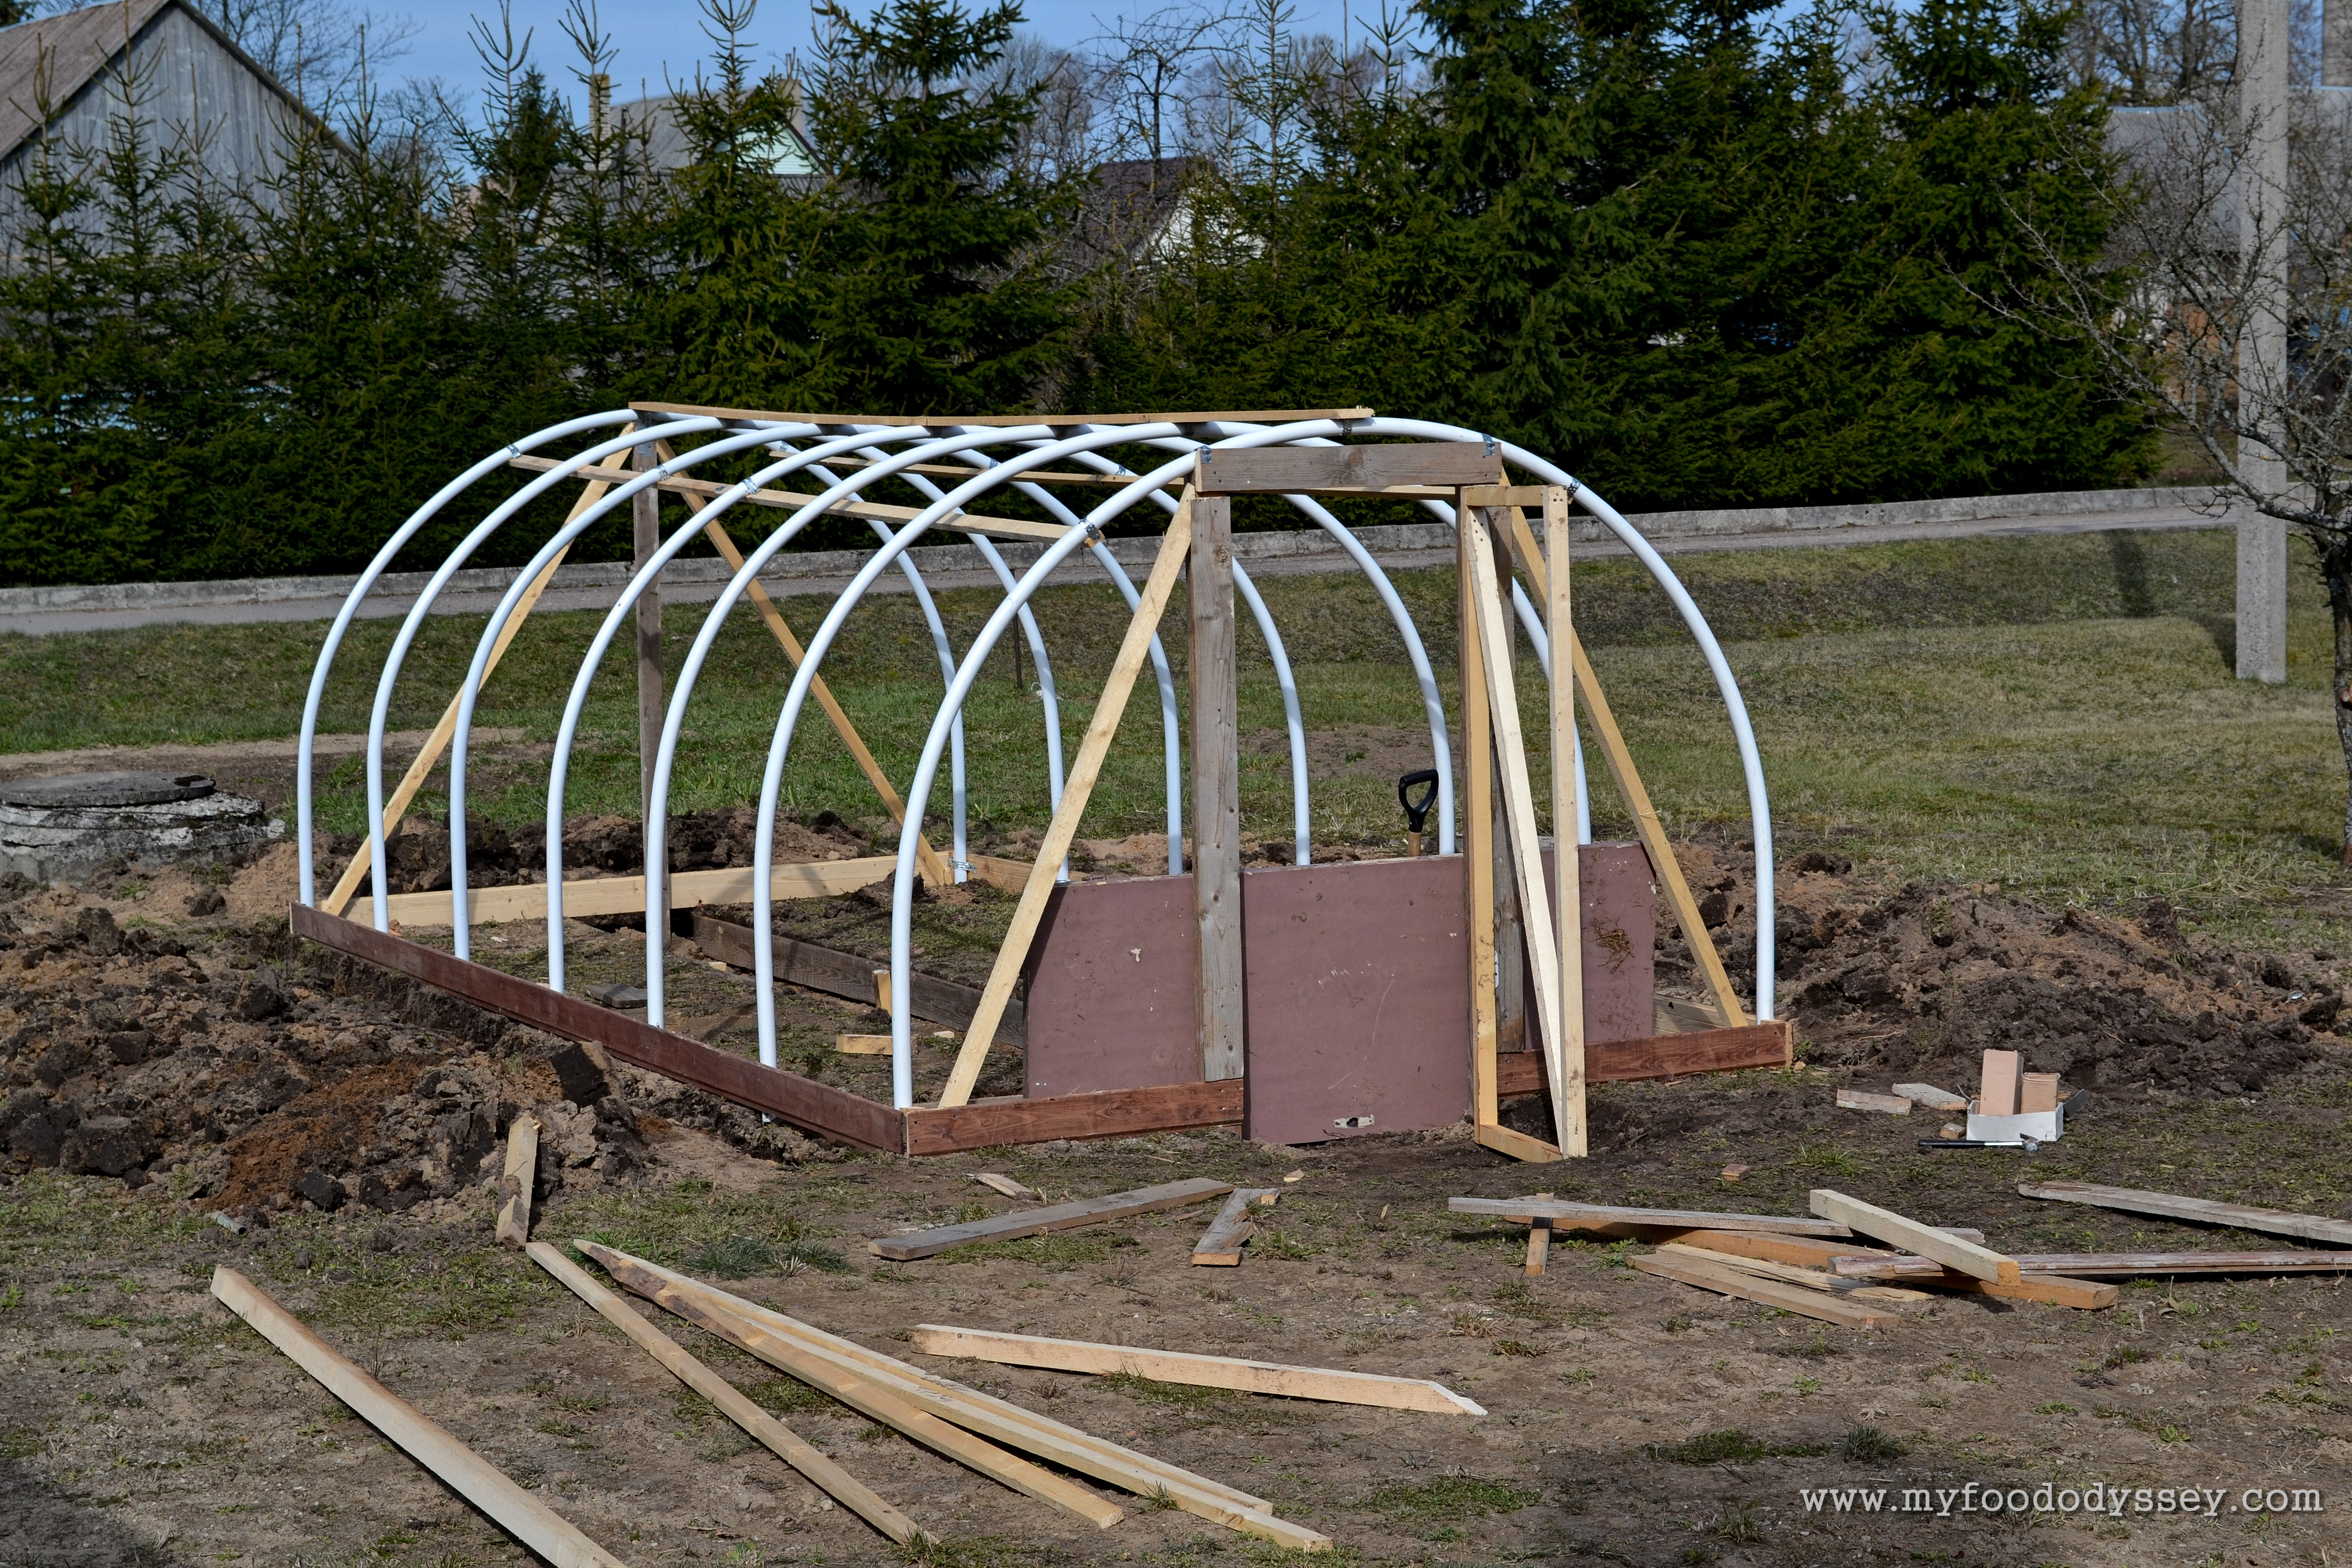
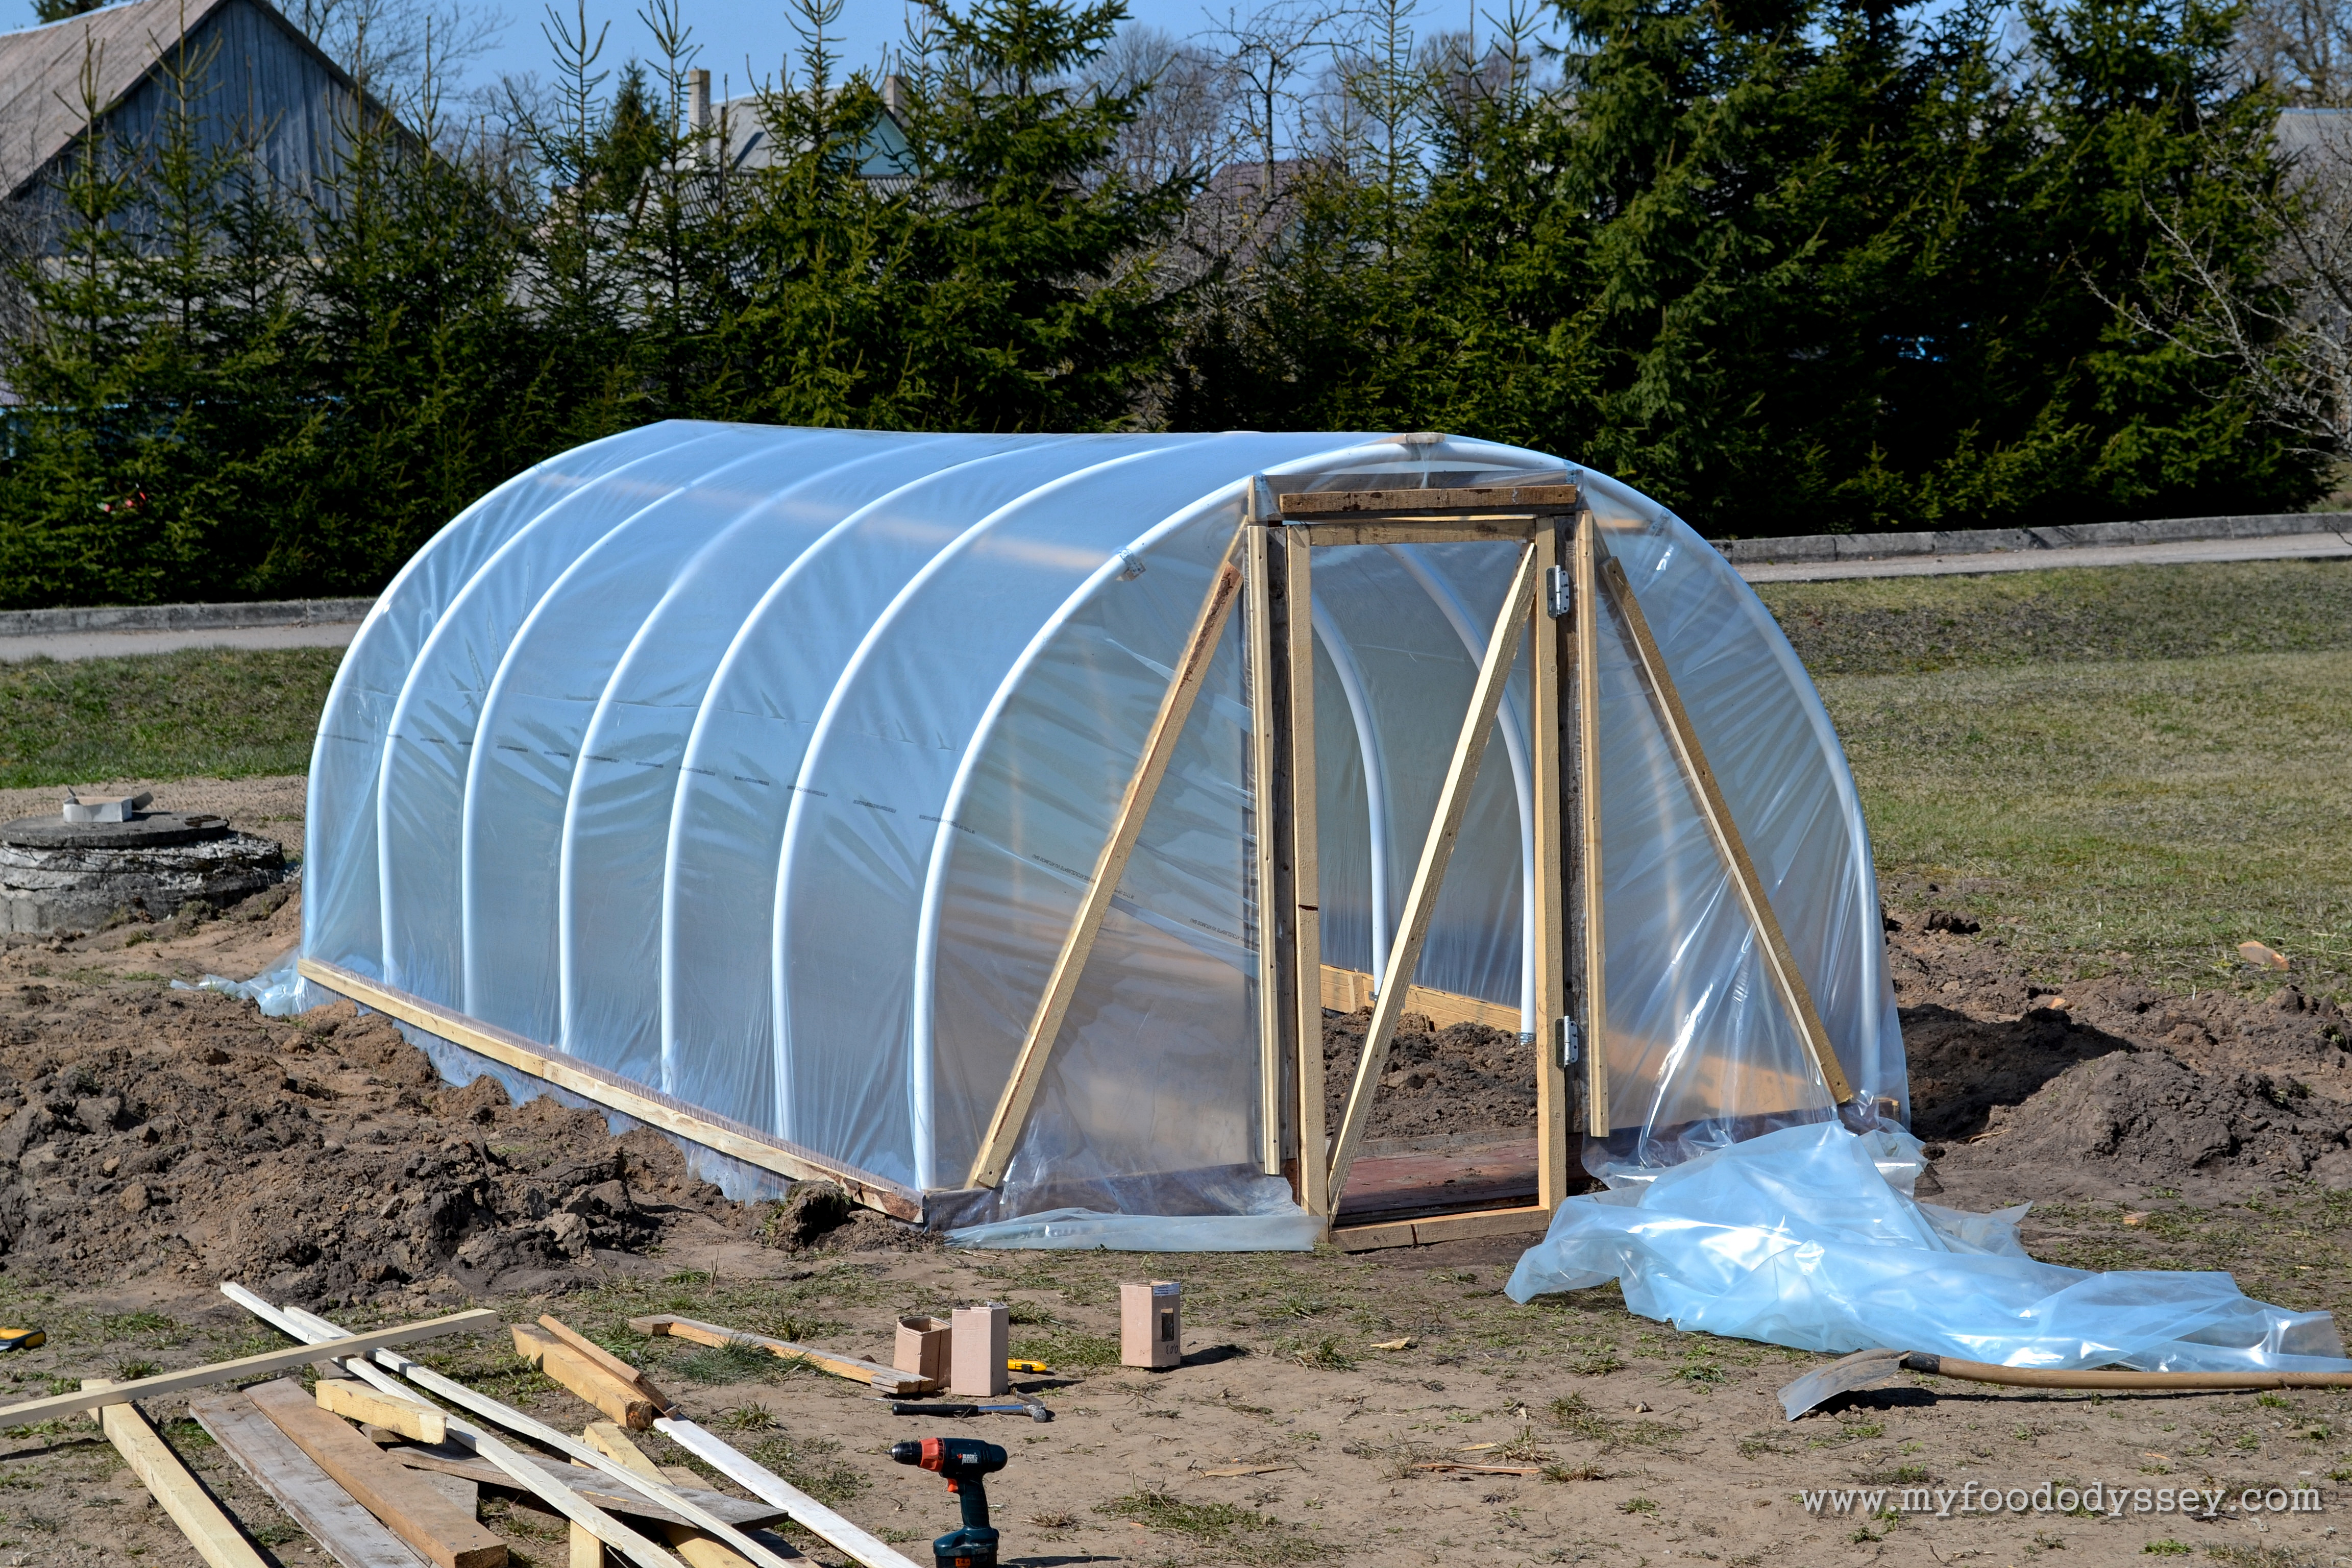
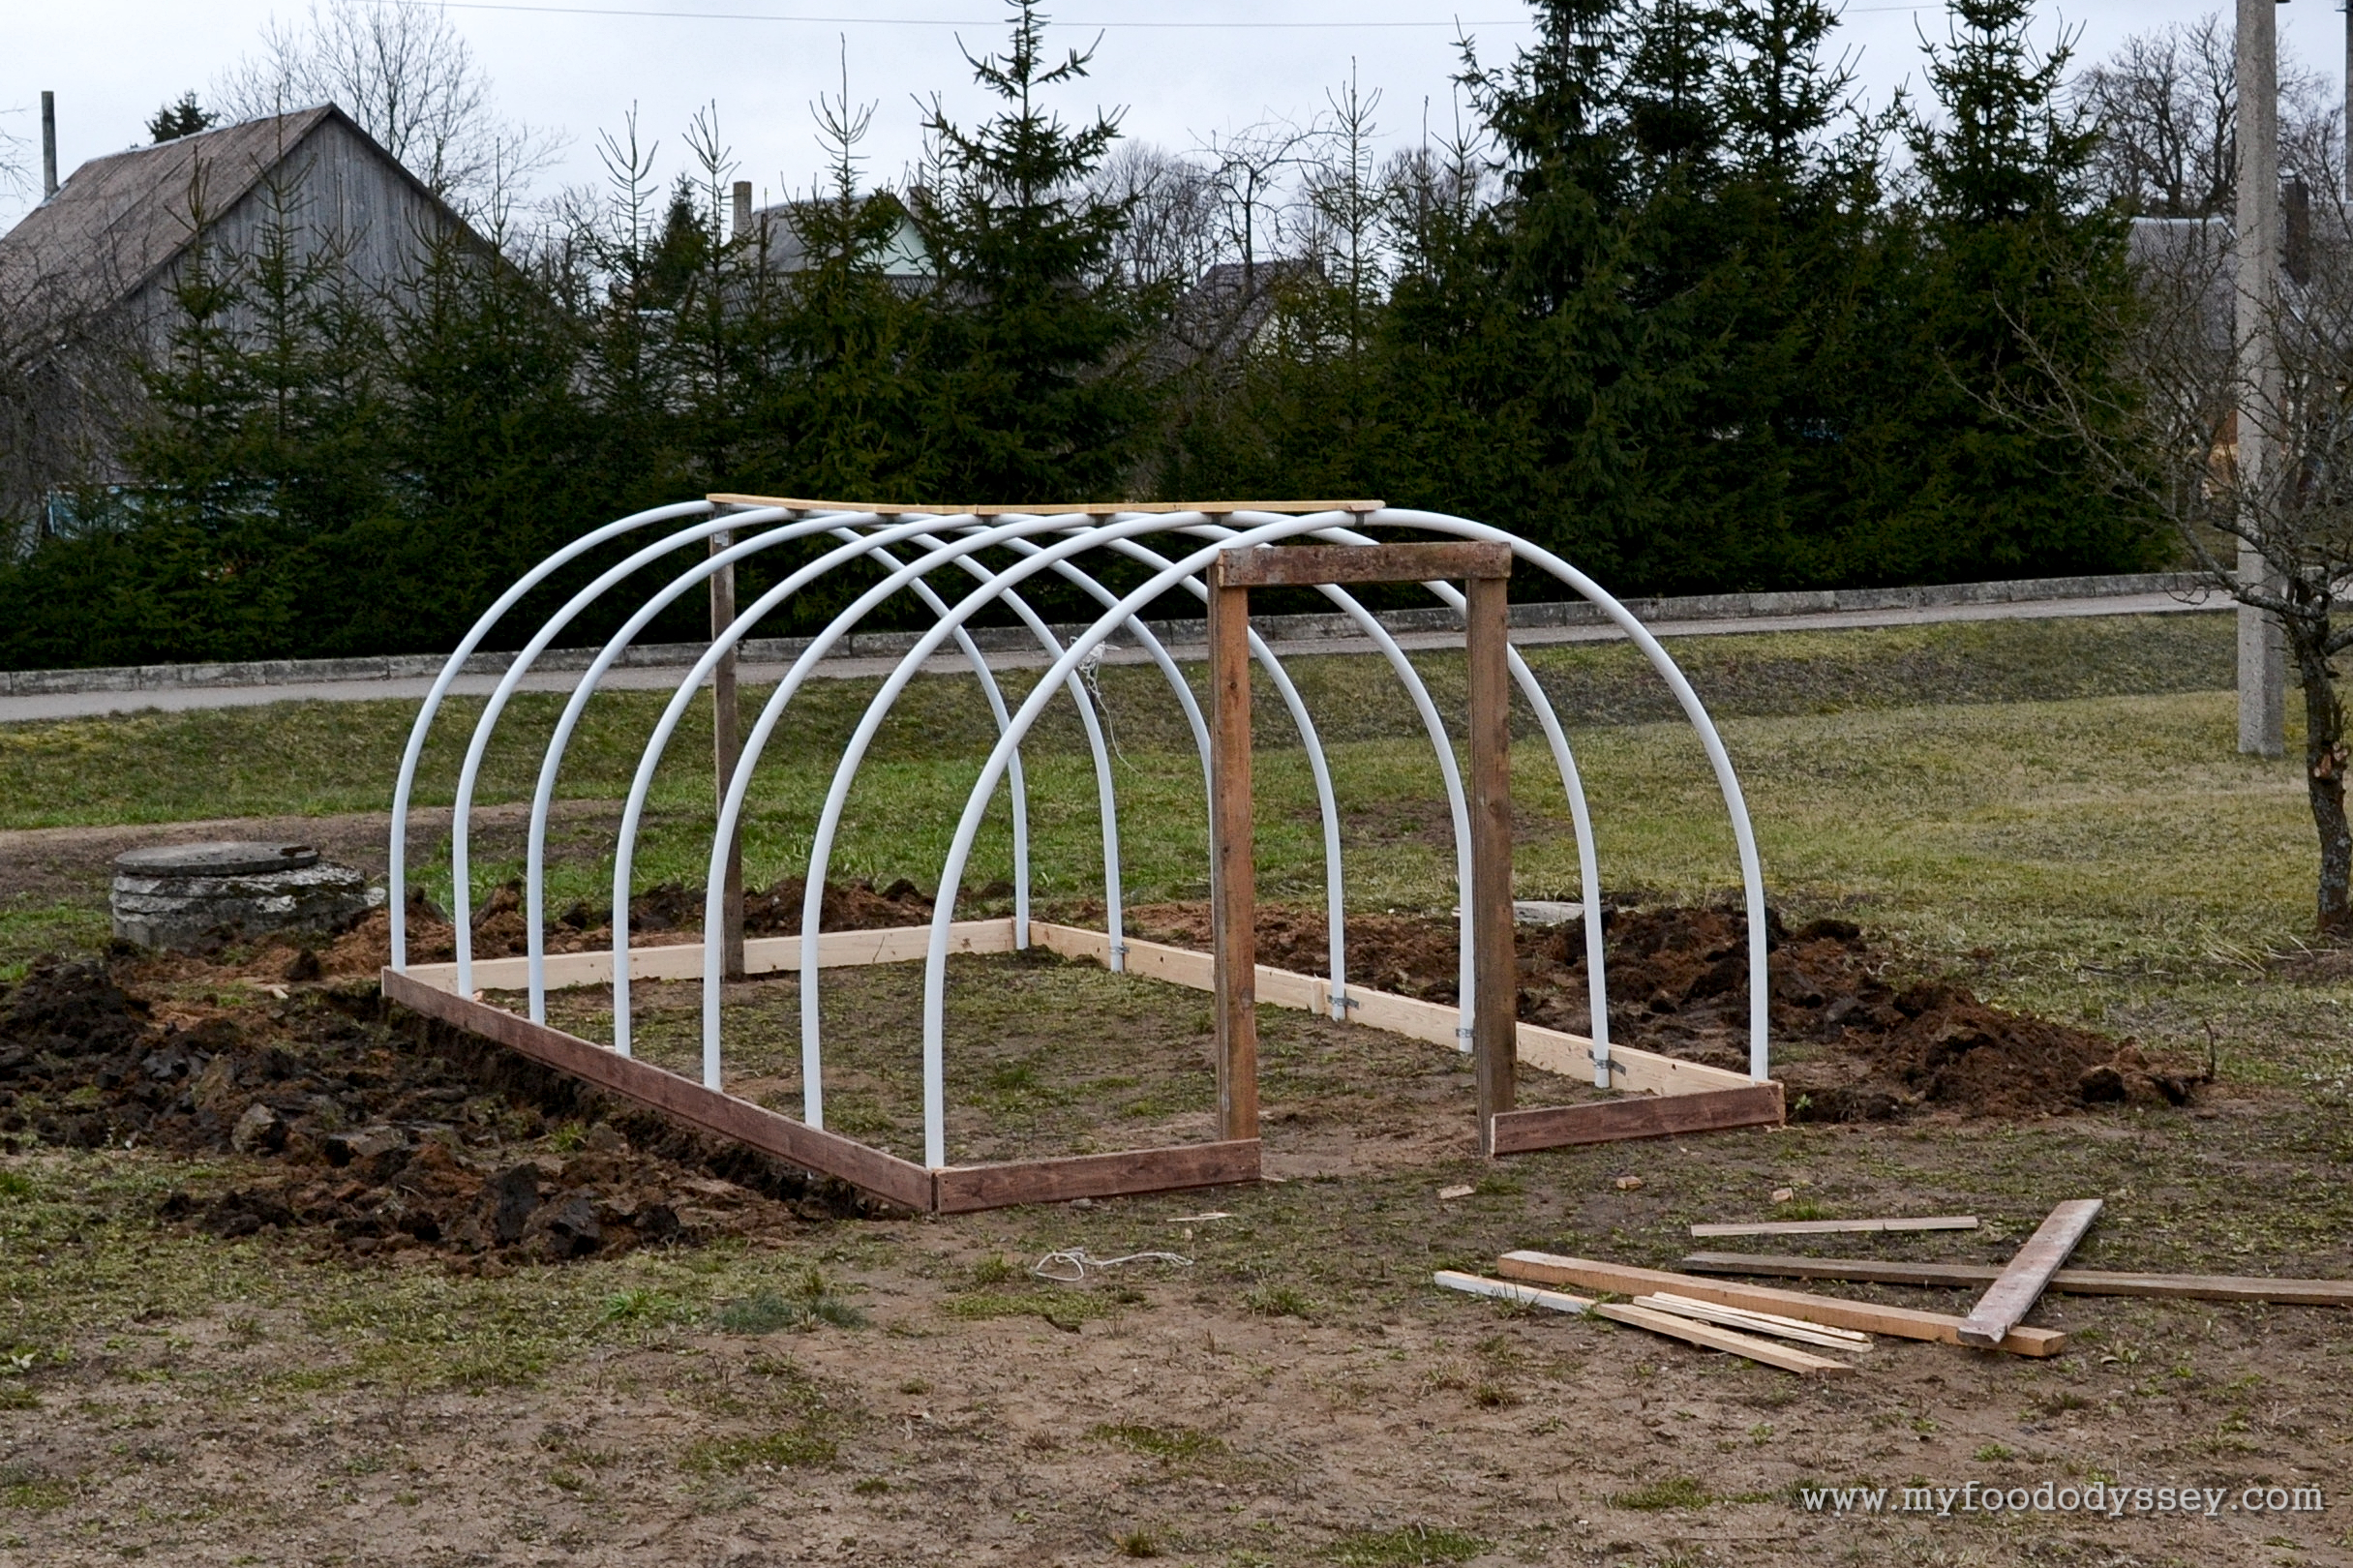
Arūnas then started work on the supporting structure. He added a wooden frame for the door, an upright support post at the rear and a length of wood down the centre of the PE pipes, again secured in place with metal connectors. Further support posts were added at each end and an outline frame was constructed for the door itself. We decided to add a wooden support down each side of the roof for stringing up our tomatoes and cucumbers.
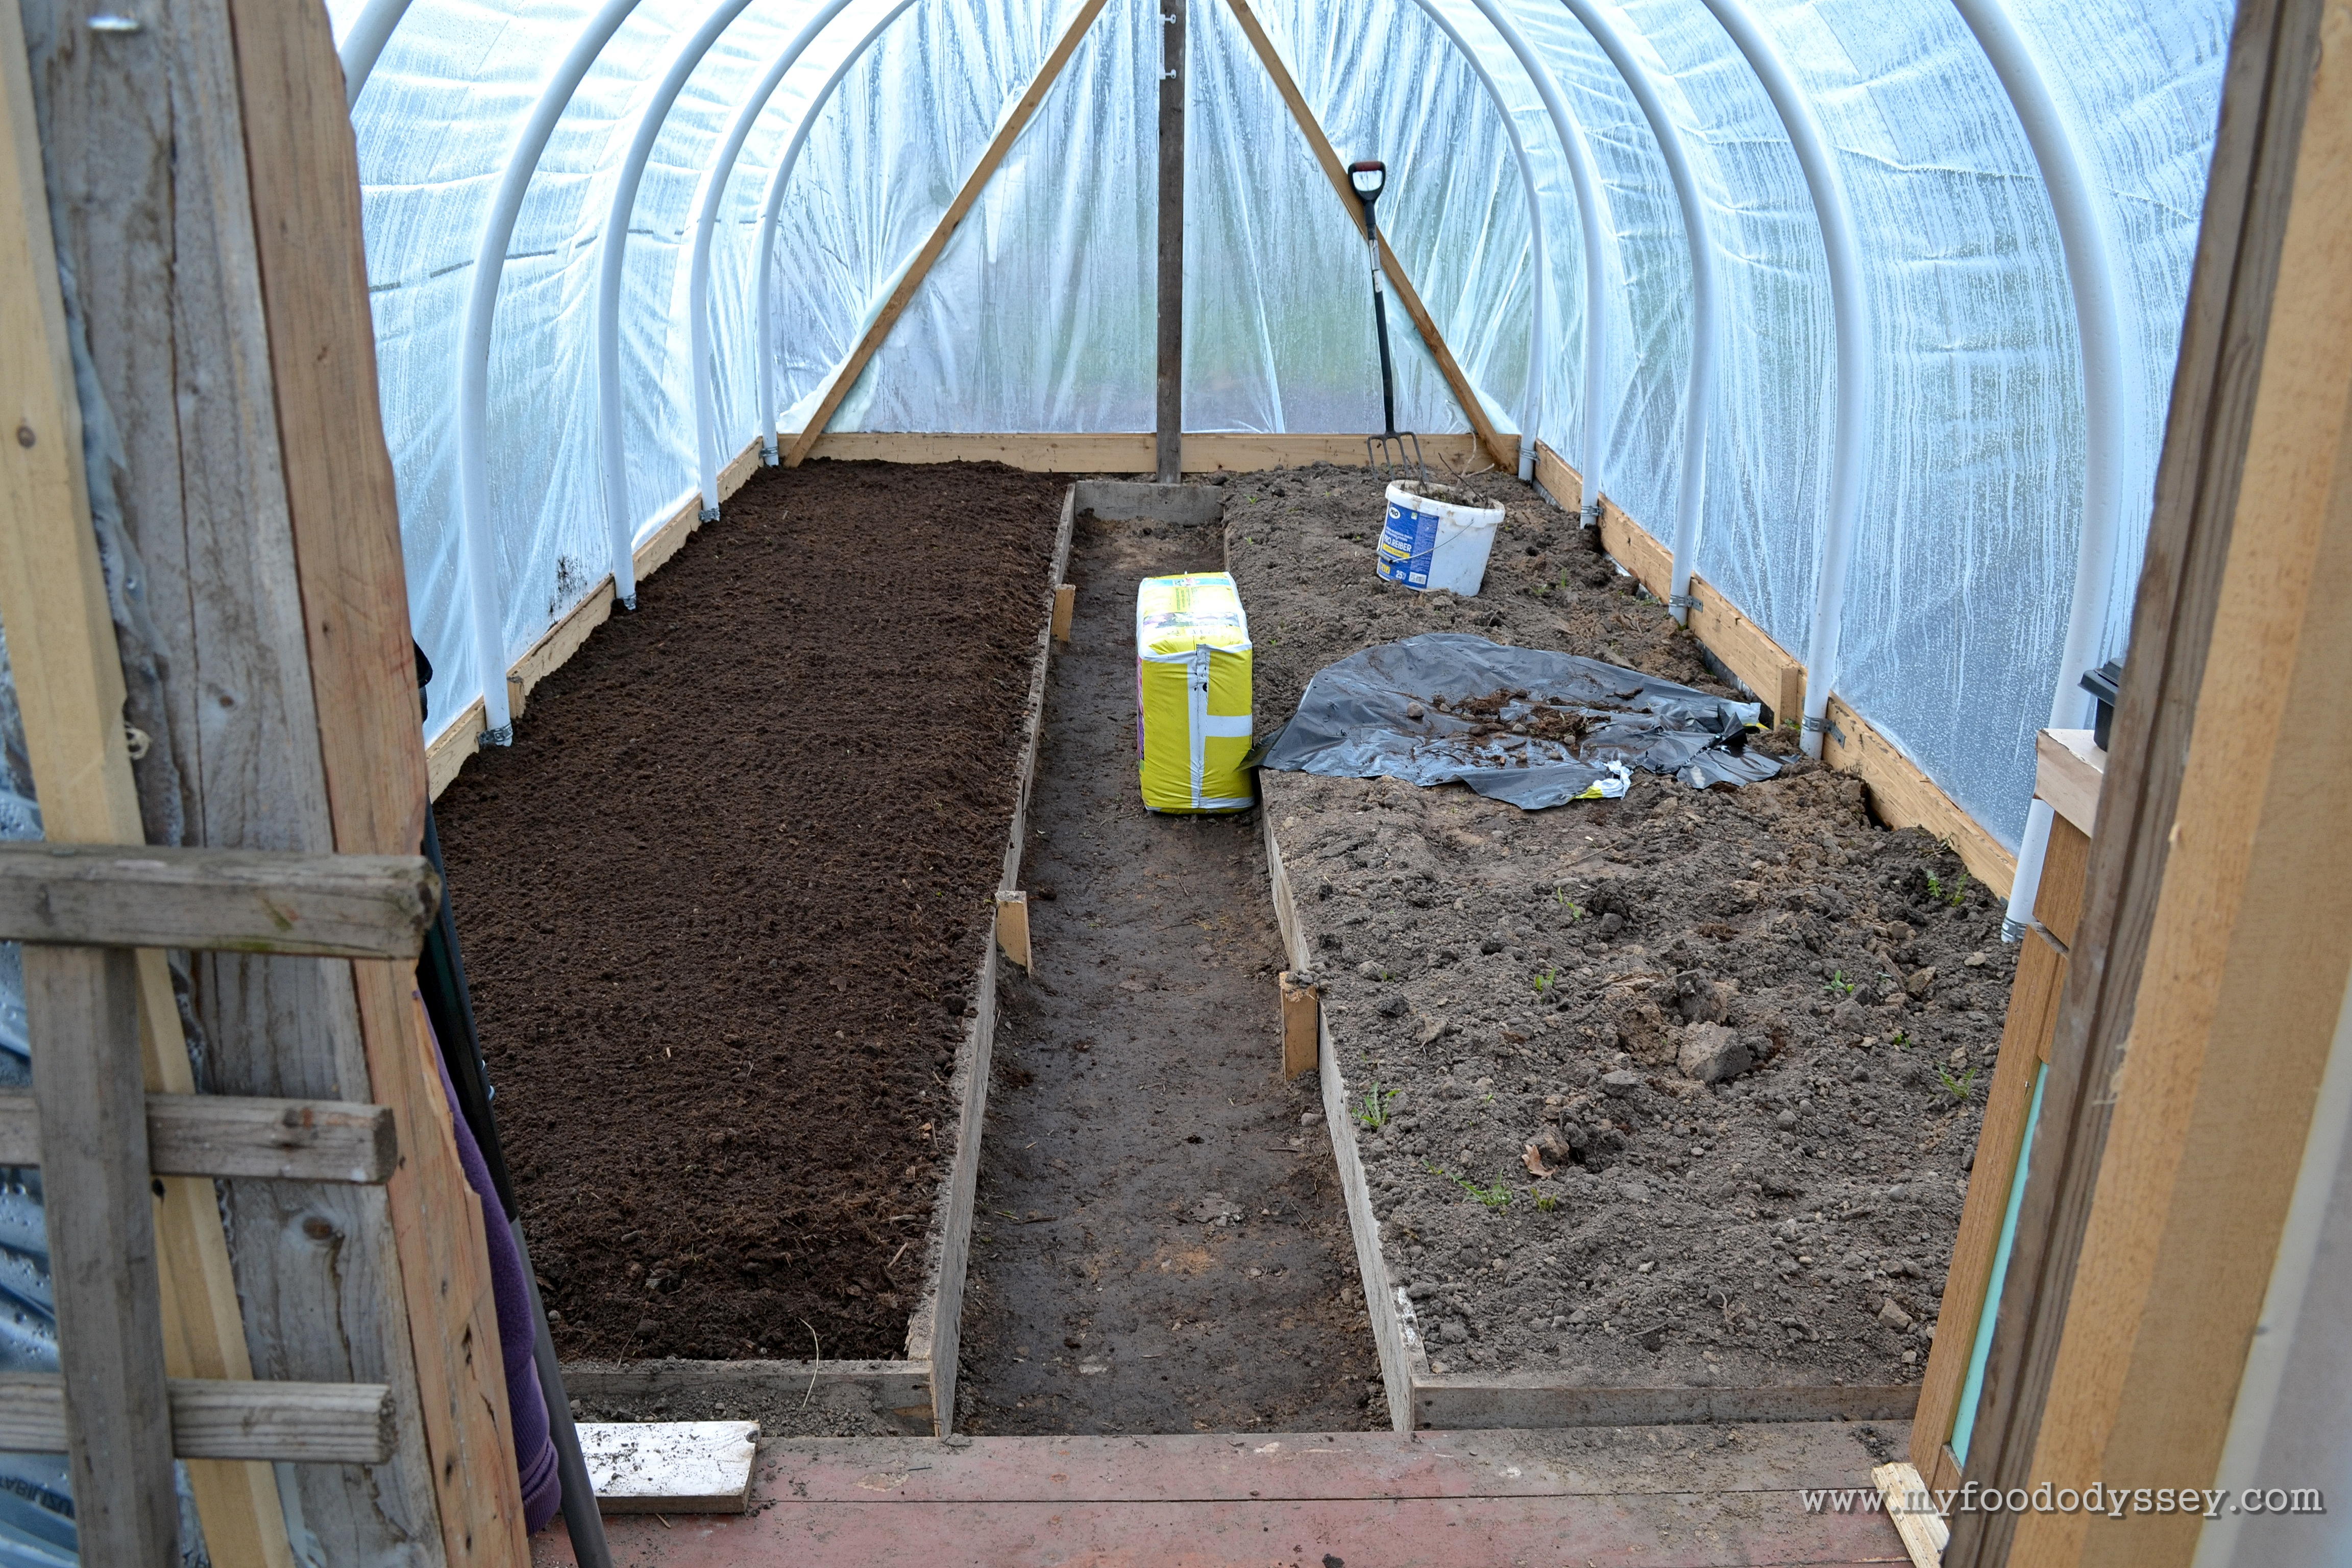
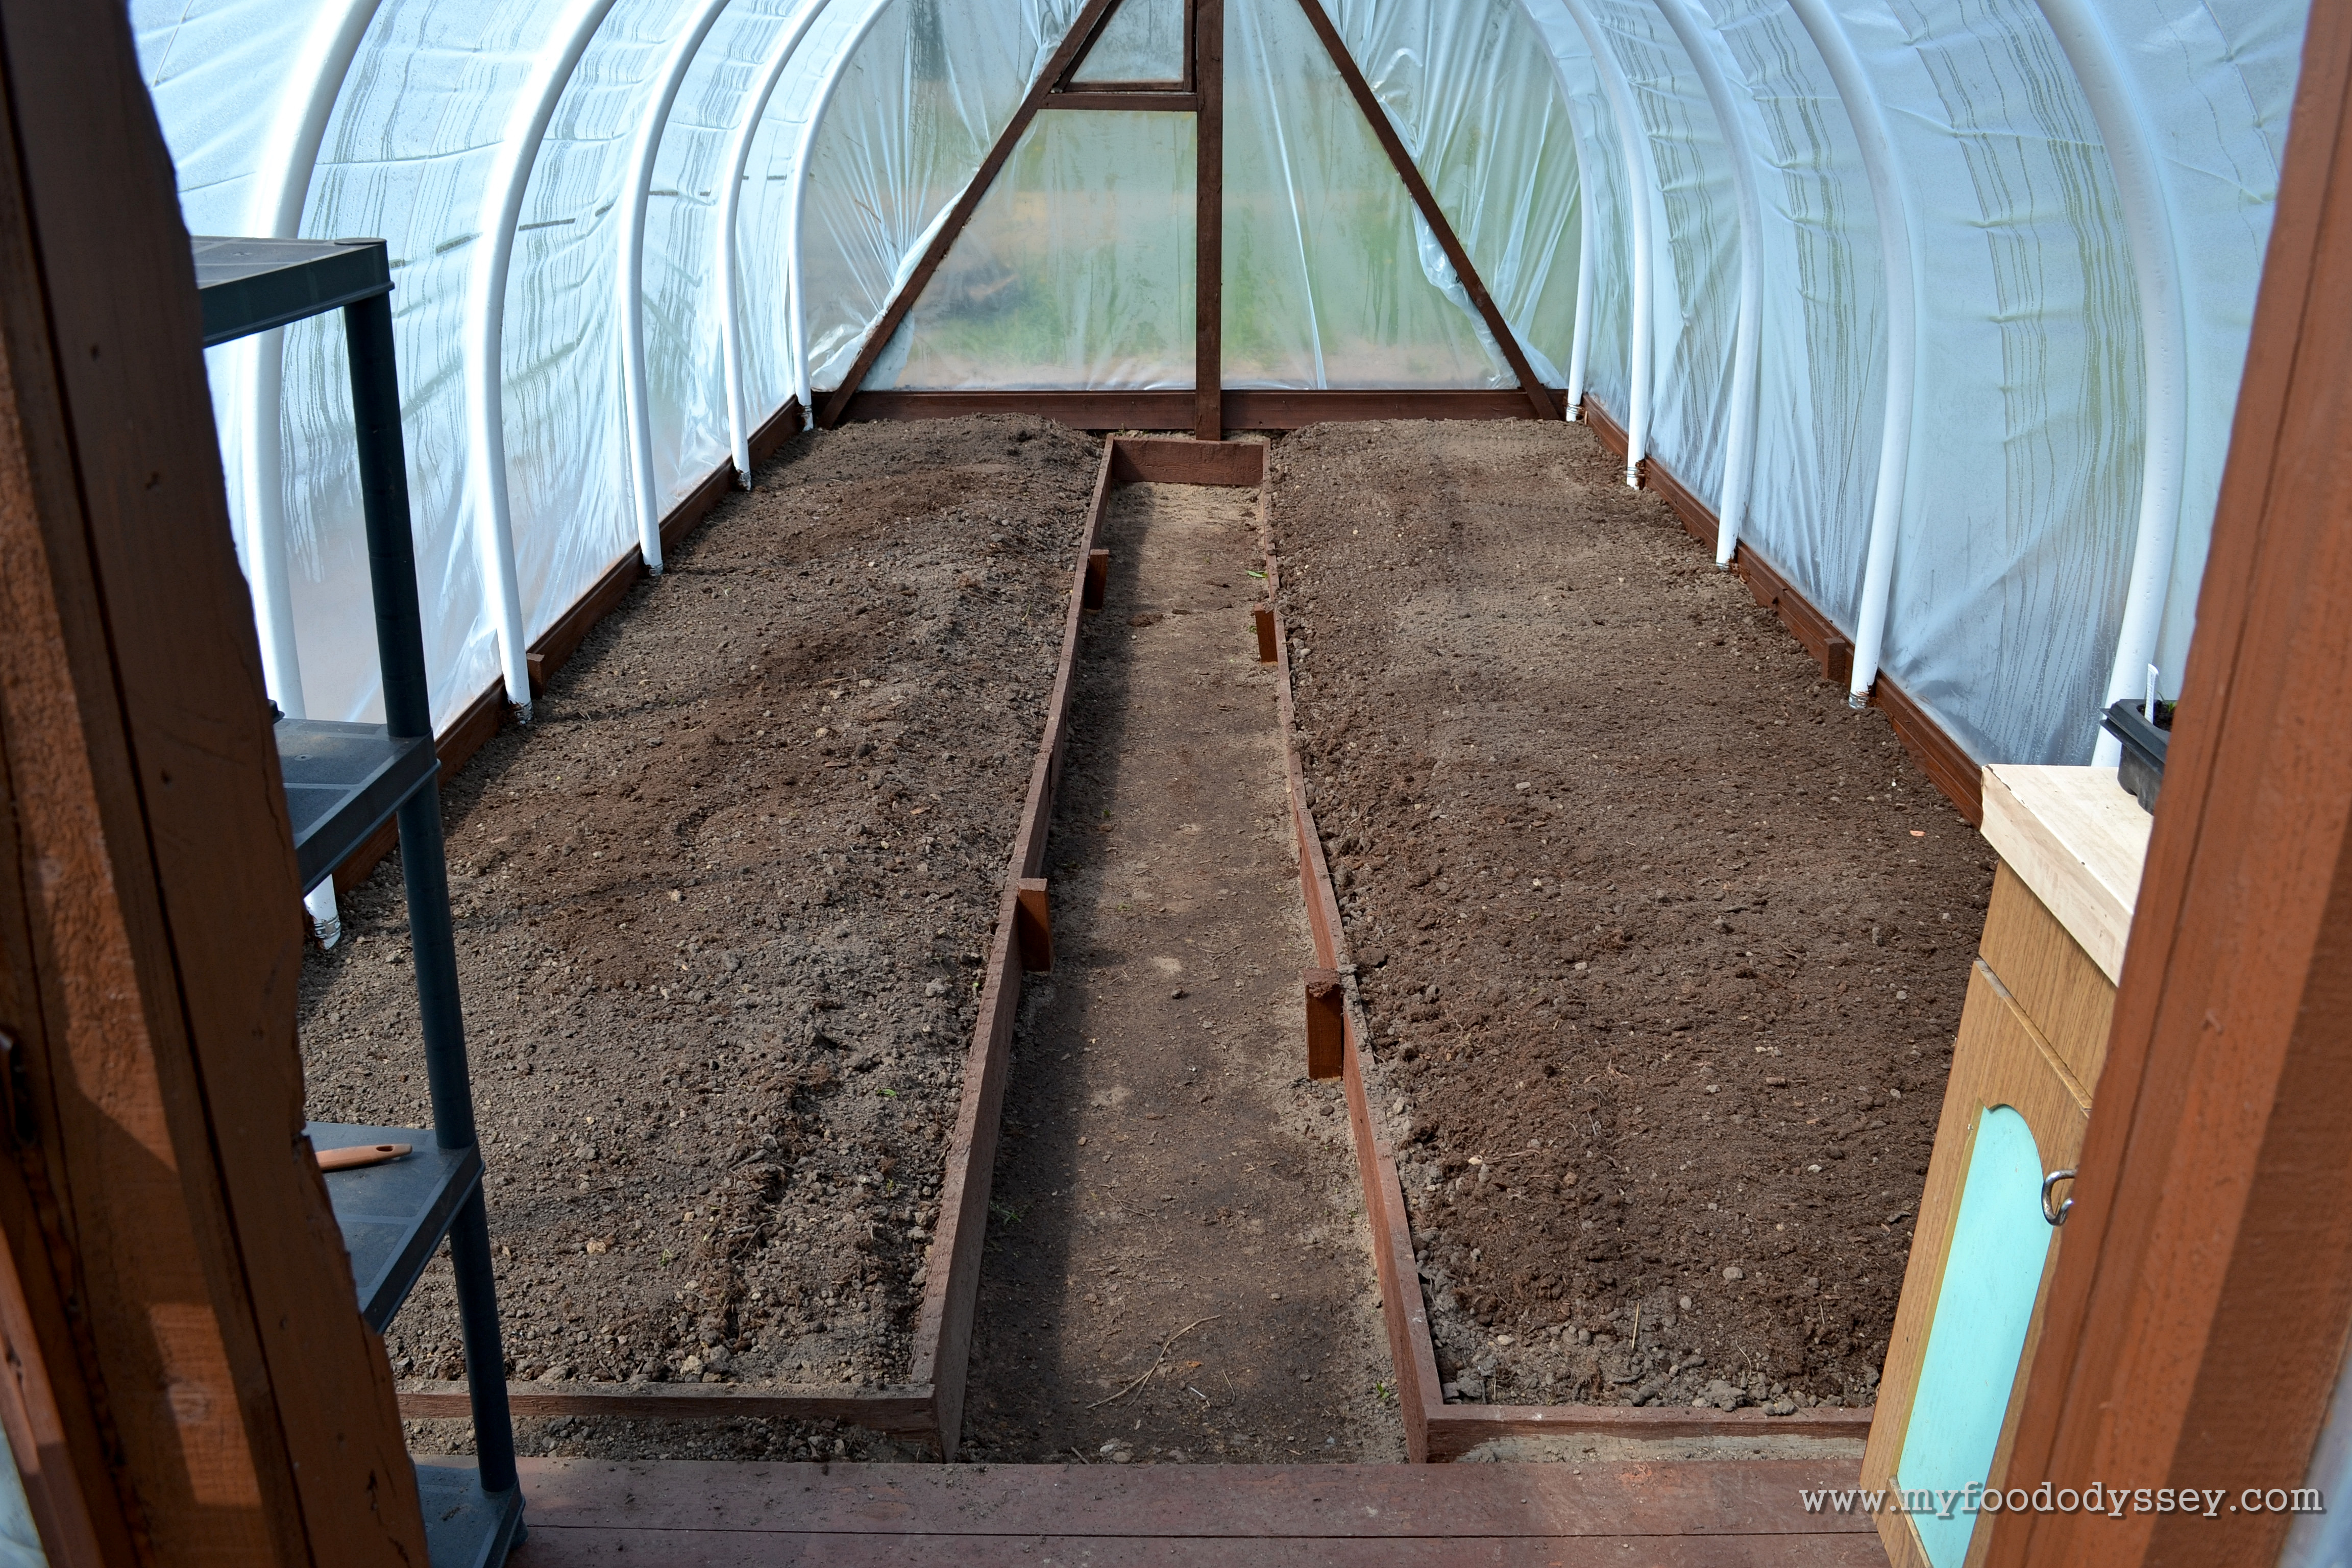
Next came some digging. The tunnel was not quite as tall as we would have liked due to the fixed length of the pipes. I’m quite tall and have a few problems with my back, so I wanted to be able to stand fully upright in the tunnel. Arūnas dug a path down the centre of tunnel to add an extra 12 cm (5”) of height. He put a wooden frame down each side of the path to create the planting beds, so my “raised beds” are in fact at ground level. We dug a deep trench all around the perimeter so that we could bury the ends of plastic sheeting to fully hold it in place, even in high winds.
The plastic sheeting was carefully laid over the structure and secured to the wooden frame with nails. The door was also covered with the same plastic. A length of wood was added at ground level around the perimeter and nailed to the original (now internal) frame for added security. The earth around the perimeter was pushed back over the ends of the plastic for both security and to create a neat finish.
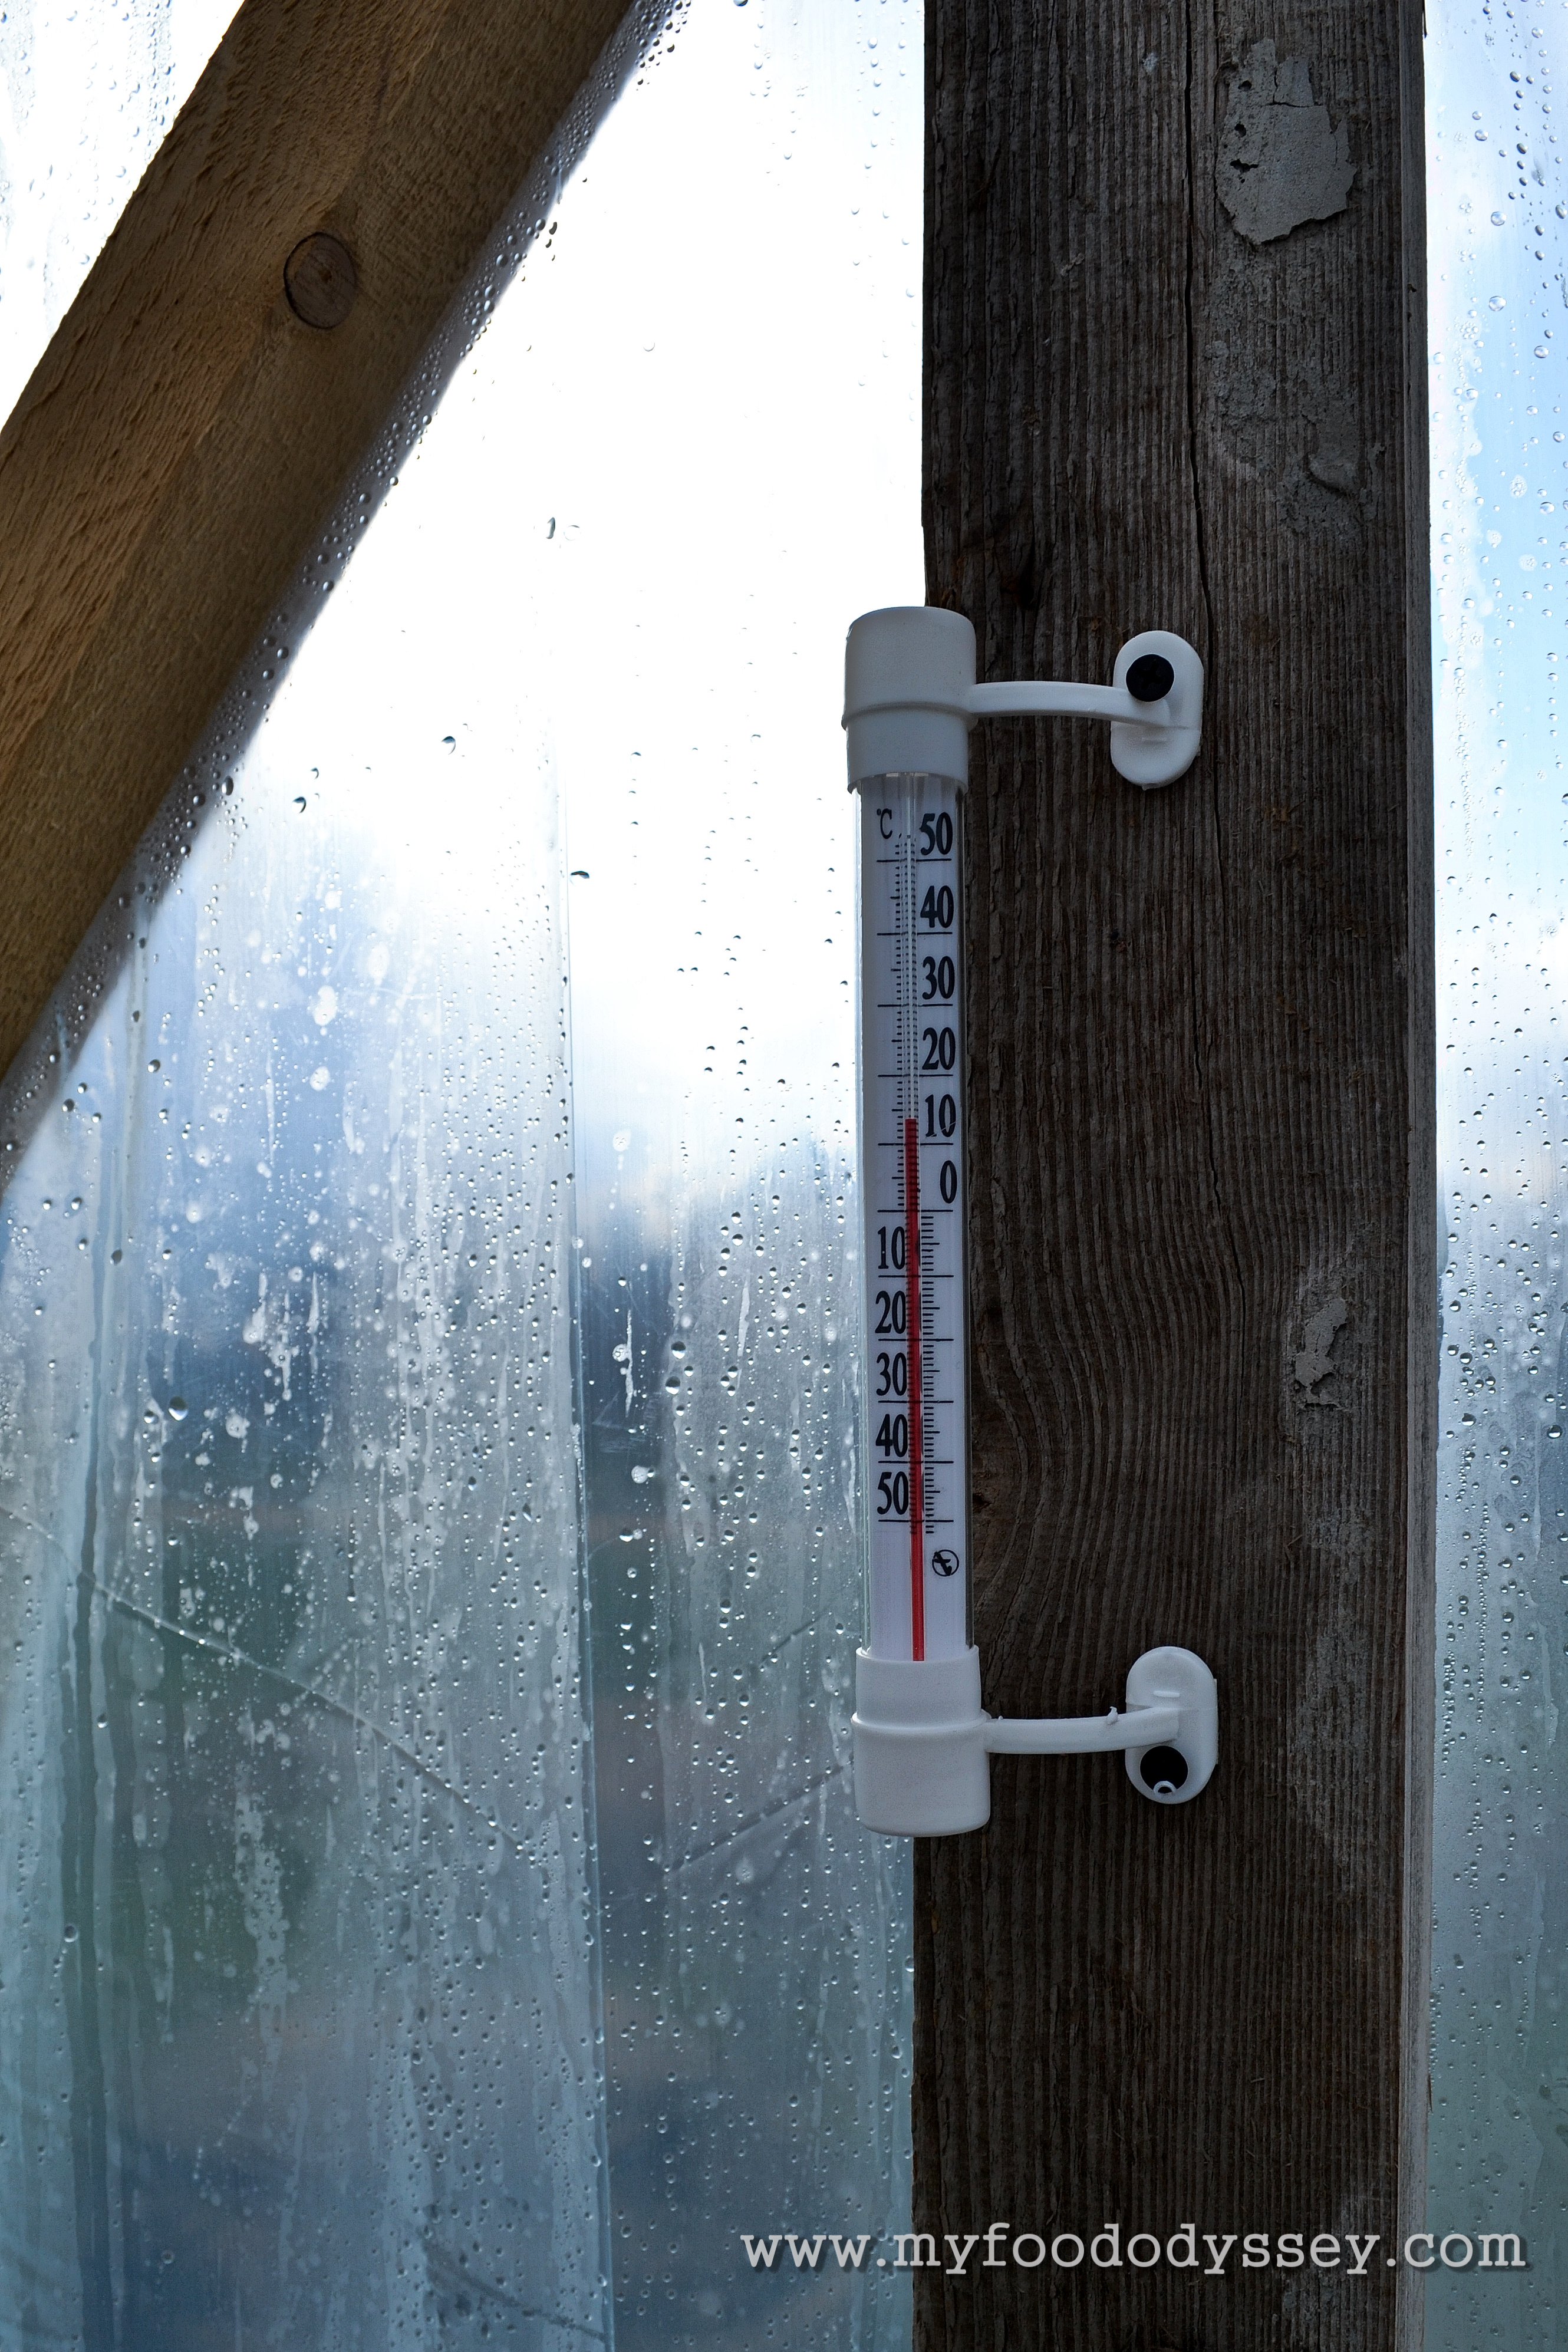
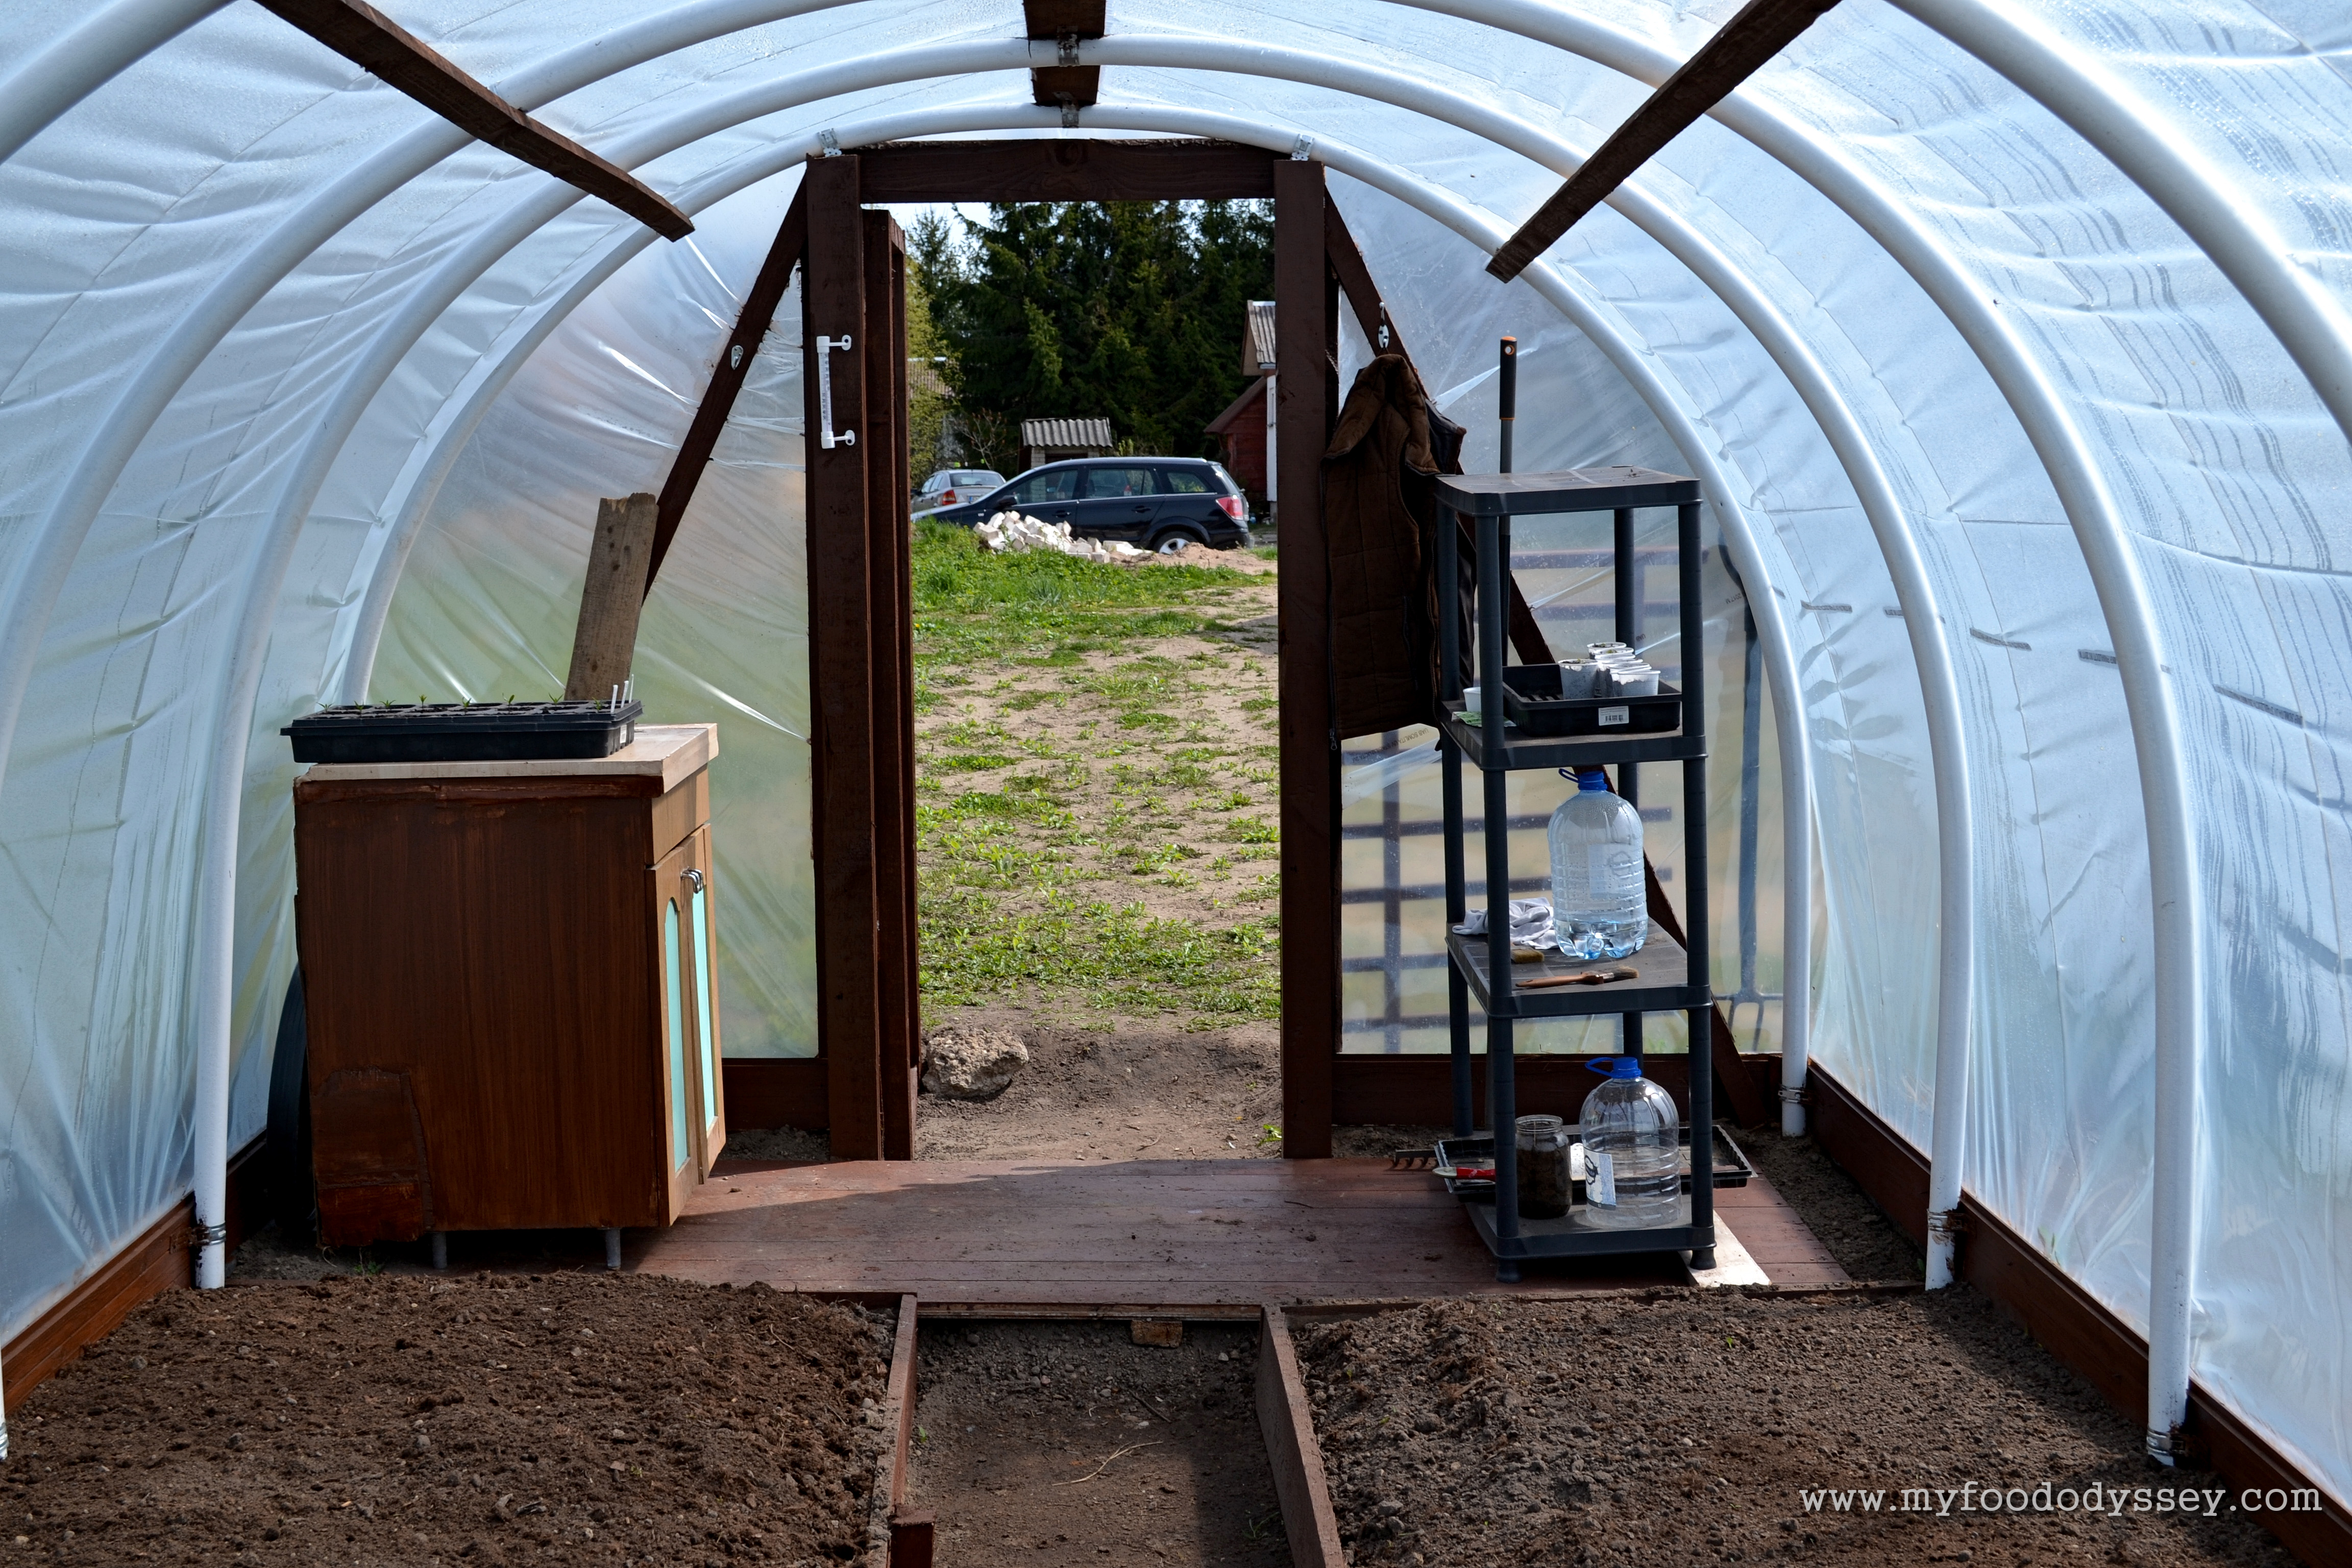
Now that I had my nice new space I set to making it workable. I dug deeply into the beds to break up the clay, removing roots and large stones. I added 150 litres of peat compost to each bed to enrich the soil and make it a little softer for planting. I added an old kitchen cabinet and some shelving for storage and to hold my seedlings. I also added a few hooks for clothes (it’s hot in there!) and a thermometer to monitor the temperature.
As an afterthought we decided to stain the wood, mostly for protection from the elements, but also to give the tunnel a nice finish. I took an old frame we had built for the chickens (the one I used to keep Beelzebub at a distance) to use as a gate to keep animals out when the door is open. We also realised we’d forgotten to include any ventilation, so Arūnas added a small pop-out window at the rear to create a draught when the door is open.
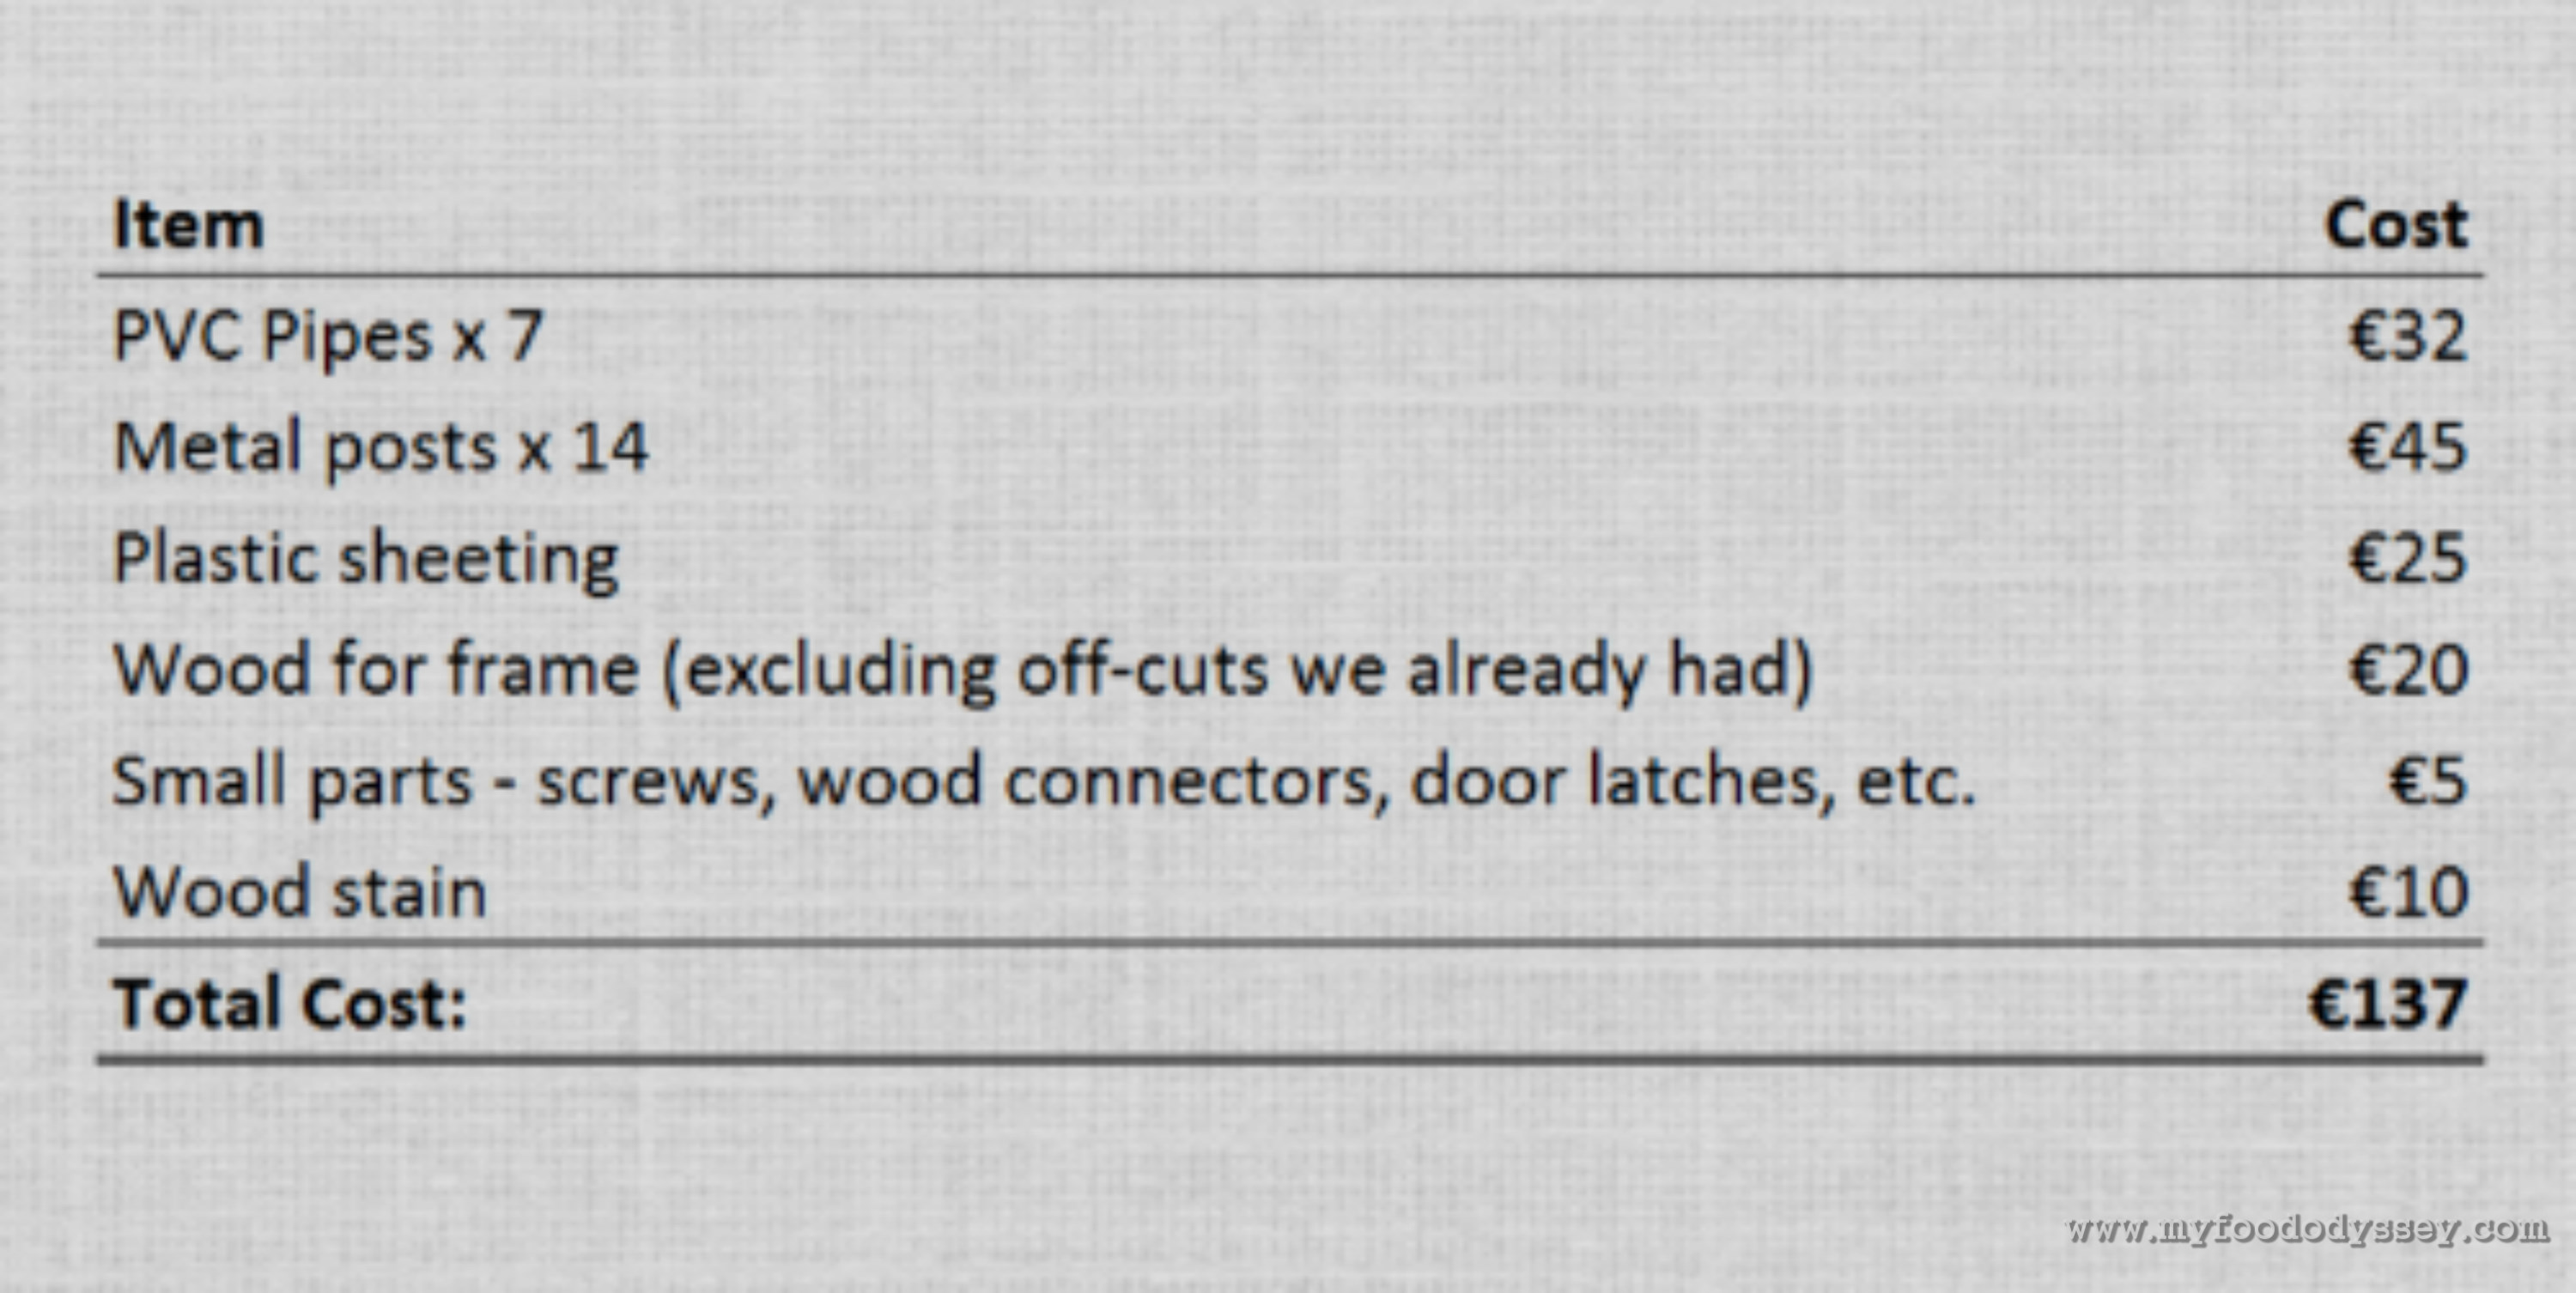
Although it took quite a bit of work I am absolutely delighted with the final polytunnel. Not including labour is cost €137 (US$155), which I think is an absolute bargain given its size and the sturdiness of the construction.
All that remains now is to plant my seedlings, which you can read about here.
Update October 2016: I have just noticed I had the plastic pipes listed as PVC when in fact they are PE. I had also given two different lengths in the comments. The correct length is 550 mm. An example of the product I used can be found here. Errors now corrected in the post and the comments.
Like what you see? Then please subscribe to My Food Odyssey. Alternatively you can follow me on Facebook, Twitter and Pinterest.


Great description and a honest details
LikeLiked by 1 person
Any suggestions where to get good quality polythene UV resistant cover, in Lithuania? Such like 180-200 microns?
P.S. Just have noticed, that you are a bit far from Ireland 😉
thanks
LikeLike
Hi Michal. Like the PE pipes, thick sheeting is widely available in Lithuanian hardware shops. We get hot summers and cold winters so thick sheeting is needed. Ours is 200.
LikeLike
Hi, i am planning to build pretty same polytunnel but do not know where to source from pe pipes like you have? I like the fact that they are white so wont produce hotspots against the plastic sheet.
thanks in advance for any tips
michal
LikeLiked by 1 person
Hi Michal. I’m not sure where in the world you are so it’s difficult for me to suggest where you might get these pipes. We got them in our local hardware store. Lots of people in our area have polytunnels so the pipes are quite popular and they always have them in stock, pre-cut to length. The pipes are 5 cm in diameter and about 0.5 cm thick. Hope that helps!
LikeLike
hey my name is john i will use your idea for a wild game bird cage. instead on plastic i would use netting for like a flight pen. am confused on one thing about these green house for plants. why do you need a use for green house when you can just plant out side? what effect does this green house do to plant? ive been in green house once but i couldn’t hold my self in it because it was so HOT! i don’t like planting but i like to raise animals. am just confused on what is a use for green house. thank you i live in Tennessee USA
LikeLiked by 1 person
Hi John. Where I live it would not be hot enough to grow vegetables like tomatoes, cucumbers and chillies outside. The greenhouse keeps the plants nice and warm so that they grow and ripen properly. The greenhouse also extends the growing season – we can plant earlier and continue harvesting later. Hope that helps! June.
LikeLike
What size were your pvc pipes and could one join two pieces of pipe together to make it a little wider and taller? Thanks J.D.
LikeLiked by 1 person
Hi Jimmy. The pipes are 5.5 metres (about 20 foot) long and 5 cm (2 inches) wide. They’re made from thick, strong plastic so I reckon you could extend them if you used a piece of wood or other inset at the join and used screws to hold the “adapter” in position. And don’t forgot our option of digging down for the central path, leaving the beds effectively raised and giving an extra bit of headroom. Hope that helps!
LikeLike
Wow that is wonderful! Have you had any problem with water pooling in the center? I am jealous! Granted the weather here is much warmer but it sure would be nice to have a bunny proofed gardening space! Good luck with your veggies!
LikeLiked by 1 person
We haven’t had any water pooling problems so far, Sandra – it seems to be quite water tight and the wooden lip around the beds catches any run-off when I water. I haven’t had any bunnies eat my outdoor veggies so far – it mostly seems to be bugs that get mine!
LikeLike
Wow, so impressed June!
LikeLiked by 1 person
Love your polytunnel, June. I hope it will be a fruitful growing season for you. Would you also be able to make use of it during the winter months, or does it simply get too cold?
LikeLiked by 1 person
I’m not sure, Jolandi. It might extend my growing season a bit – I might be able to plant lettuce or other outdoor plants indoors and get an extra few weeks. I might try planting hard plants over the winter, maybe for a spring crop. The worst that can happen is that they don’t grow!
LikeLiked by 1 person
True. And in the meantime I am sure you will have lots of fun experimenting. Enjoy! I looking forward to seeing the results, June.
LikeLiked by 1 person
Absolute stunner !
LikeLiked by 1 person
Looks like a great Polytunnel. You will get a lot of good use out of it. 🙂
LikeLiked by 1 person
That’s a really great! One question though. What size pvc did you use?
LikeLiked by 1 person
Thanks! The pipes are 5 cm in diameter and 550 cm long. Hope that helps!
LikeLike
With a bit of conversion it will help a lot. Thanks
LikeLiked by 1 person
That is amazing!!!! Will you come to my place and build one for me? 🙂
LikeLiked by 1 person
Sure! I’m on my way! Can I get some of your fab tomato plants while I’m there?!
LikeLike
Sure! You can have as many as you like! 🙂
LikeLiked by 1 person
Wow,very posh 🙂
Not seen a grown up tunnel like that before. Here we construct out own. We used curtain tracks sandwiched together with 8mm building steel rods inside the sandwich – works a treat (see link below). Out of interest, what grade poly did you use? We have to use thick 36 month stuff, else the 47C heat and sun cracks and disintegrates it within 6 months.
LikeLike
Oh wow – your tunnel looks great! And with a little cute windowsill and everything! I just asked Arunas which poly we used and he said “the thicker one”. I’m not sure what that means, but it was the more expensive of the two options available. I think the spec is imprinted on the plastic so I’ll check for you tomorrow. We don’t get quite that heat but we do get serious cold in winter, so different problems to overcome.
LikeLiked by 1 person
Had a look at the poly today and it’s 200 microns. Means nothing to me, but it might to you!
LikeLike
Nope, lol…We need simplicity here, so ours is 12m, 24m, or 36m 🙂
Checked online, and looks like ours is 175, with 200 being the 60 month type (which I’ve never seen in these parts).
Live n learn every day 🙂
LikeLiked by 1 person
I am in total awe and admiration of how resourceful you and Arunas are. Well done!
LikeLiked by 1 person
Thank you Nancy! Hope you’re starting to feel like yourself again!
LikeLike
Feeling good as new, June!
LikeLiked by 1 person
Enjoy your tunnel…. we love ours!
LikeLiked by 1 person
Awesome. You guys do amazing work. You’re gonna have so much fun growing your goodies in this!
LikeLiked by 1 person
Thanks for sharing. And when you get your bumper crop of tomatoes and peppers you’ll have to share your recipe for salsa! 🙂
LikeLiked by 1 person
Definitely, Lynn. I think I’ll be sharing lots of recipes for veggies this year!
LikeLike
What a great project and at an amazing cost…you should patent that design! Well done to both of you.
LikeLiked by 1 person
Thanks Gary! Unfortunately we borrowed ideas from others so we can’t patent, but we’re definitely looking forward to the fruits of our labour!
LikeLike